Terminology
Step Plan
A named set of steps that accomplish some goal. There are 2 basic types of plans: ordered and unordered.
Step
A part of a plan. There are 3 types of steps: Group label, Sub-Group label and Task.
Ordered Plan
A plan where “Task” steps must be completed in a prescribed order; e.g. recipe.
Unordered Plan
A plan where “Task” steps can be completed in any order. This is a typical “To Do” list.
Group Label
A top-level label used for organizing steps.
Sub-Group Label
A 2nd level label used for organizing steps. A sub-group must be defined under a group label.
Task
A step that requires a user’s completion.
Task Content
You define what information will be displayed for each “Task” step. You can provide a URL, a description and/or a “Widget Instance ID.” The URL will be displayed as a HTML anchor tag. The description text will be displayed as provided. The “Widget Instance ID” will result in the contents of that widget being displayed for that task.
Task Scheduling
You can define when the task can start and when the task should be completed. In the “Delayed Start” field provide the number of days (from the start of the plan instance) to wait until the task can start. In the “Due In” field, provide the number of days (from the start of the plan instance) in which the task should have been completed.
% Done
You can define what percentage of the whole plan, this completed task represents.
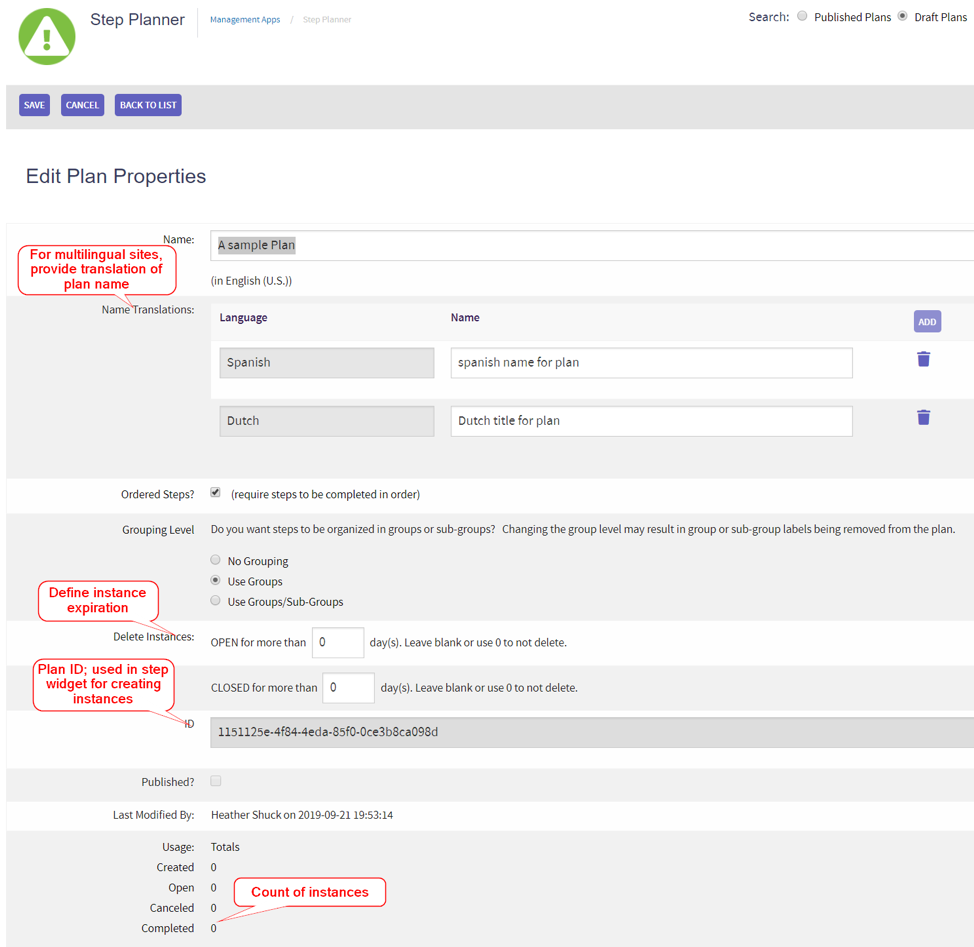
Translations
On a multilingual site, you will be prompted to provide translations for the plan name, step name and step description text.
Grouping Level
“Task” steps can be grouped directly under:
- the plan (“No Grouping”),
- group labels (“Group” level) or
- sub-group labels (“Sub-Group” level).
Instance Expiration
On the “Plan Properties” page you can define how long a completed or open plan instance should be kept in the system before it is deleted.
Instance Statistics
The system will maintain a count of the number of “Created,” “Open,” “Canceled,” and “Completed” plan instances. You can view these counts on the plan’s “Properties” page.
Step Plan Instance
A usage, or instance, of a plan. An instance will have a start date, a creator (the person that created the instance), a subject (who the plan instance is about) and an assignee (the person who completes the “Task” steps). For the first release of the “Step Planner” the creator, subject and assignee will be the same person.
Installing Step Planner
Step Planner Pages in AppManager
Step Planner User Interface
Step Planner/Plan Properties Page:
Step Page
FAQ
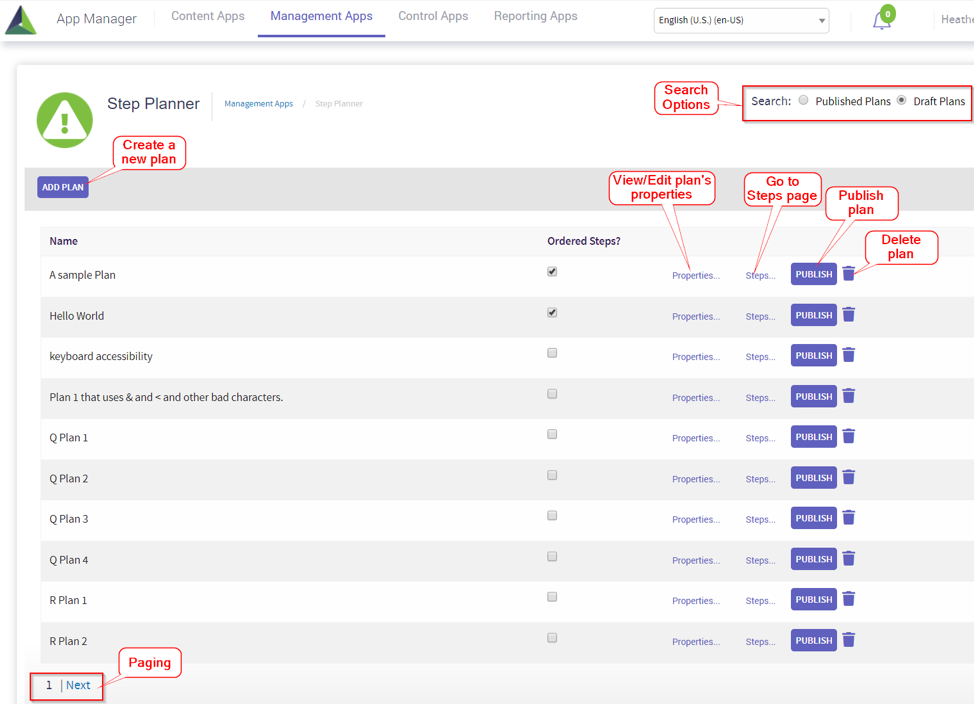
How do I create a step plan?
- Click on AppMgr > Management Apps > Step Planner
- Click on “Add” button
- Define the plan’s name and properties
- Click on the “Save” button
- Click on the “Back to List” button
- Find the new plan in the list and click on its “Steps…” button
- Enter the desired steps in the “Step” page
- Click on the “Save & Exit” button
- Find the new plan in the list and click on the “Publish” button.
How do I move a group of steps in a plan?
The “Step” page provides up and down arrows to move a step. If the step is a group or sub-group label and you want to move the group and its sub-steps, first collapse the step by clicking on the chevron by the step name. Now that the group is collapsed, the icons for the move arrows have changed. This indicates that moving the collapsed group up or down will also move its sub-steps.
How do I delete a group of steps in a plan?
The “Step” page provides a delete button to delete a step. If the step is a group or sub-group label and you want to delete the group and its sub-steps, first collapse the step by clicking on the chevron by the step name. Now that the group is collapsed, the icon for the delete button has changed. This indicates that deleting the collapsed group will also delete its sub-steps.
How do I add a “Task” step to a plan?
The “Step” page provides a “T+” button to the right of each step. This button will add a new “Task” step underneath the current step.
How do I add a “Sub-Group label” step to a plan?
If your plan has selected the grouping level of “Sub-Group”, the “Step” page provides a “SG+” button to the right of each step. This button will add a new “Sub-Group label” step underneath the current step.
How do I add a “Group label” step to a plan?
If your plan has selected the grouping level of “Group” or “Sub-Group,” the “Step” page provides a “G+” button to the right of each step. This button will add a new “Group label” step underneath the current step.
Why is there a red rectangle next to one of my steps?
If your plan is configured to use grouping, the “Step” page will indicate if a step is not placed at the correct group level. Here are the correct placements for steps based on the 2 different plan grouping levels
Group Level:
- Group Label Step
- Task Steps
- Group 2 Label Step
- Task Steps
Sub-Group Level:
- Group Label Step
- Sub-Group Label Step
- Task Steps
- Sub-Group2 Label Step
- Task Steps
- Group2 Label Step
- Sub-Group3 Label Step
- Task Steps
- Sub-Group4 Label Step
- Task Steps
- Sub-Group3 Label Step
- Sub-Group Label Step
How do I add a step plan to a page (to allow users to create plan instances)?
- Ensure that the step plan is published.
- Copy the step plan ID from the plan’s “Properties” page in AppManager.
- Create a widget instance of the “StepPlanWidget” widget.
- Enter the “plan ID” in the “Plan ID” property
- Place the widget instance on the desired page.
How do I change a published plan?
- On the AppMgr > Management Apps > Step Planner page query the published plans.
- Find the desired plan and click the “Unpublish” button.
- Make your desired changes.
- Click on the “Publish” button next to the desired plan.
- NOTE: while the plan is being edited, no new plan instances can be created. “In Progress” plan instances will continue to use the published plan definition at the time the instance was started.
Why can’t people start an instance of my plan?
Instances can only be created for published plans. Ensure that the plan is published.