Overview
The purpose of this document is to establish the base installation and configuration for Akumina Headless V2.
Runtime
- Stack: .NET 6 (LTS)
- OS: Linux or Windows
Prerequisites
The following are the prerequisites:
- Akumina Headless release file (.Zip format)
- Template files (.Zip format)
- AppManager 5.5 latest release
- If upgrading from prior 5.5 (.1709)
- /admin/db
- Click on upgrade next to each option
- SharePoint site collection
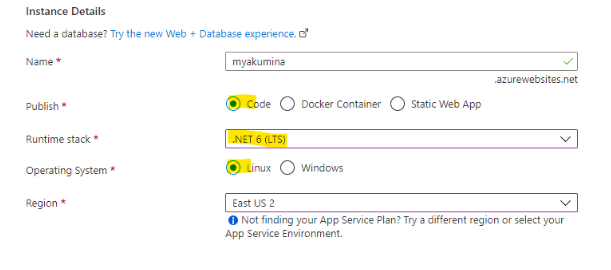
- Azure Services – Headless Front End Runtine
- Login to https://portal.azure.com
- Select your subscription
- Create Linux App / Service Plan (Windows App Service/ Service Plan), Log Analytics workspace, App Insight, Redis Cache, Storage Account, and Key Vault. Please note that while creating App Service, make sure that the Publish, Runtime stack, and Operation System Is selected as shown below.
- Identify Configuration
- Scaling – P1V1 – Minimum – 1 CPU 3.5 GB RAM (GiB)
Environments
Azure App Service
Extract the zip, then upload the files to App Service ~/site/wwwroot using FTP. You can download FTP credentials from Azure App Service.
Windows Server (Any cloud or on-prem)
Using Windows Server 2022/IIS 10 (ASP.NET Core Module v2)
- Install ASP.NET Core Runtime 6.0.2 (https://dotnet.microsoft.com/en-us/download/dotnet/thank-you/runtime-aspnetcore-6.0.2-windows-x64-installer)
- Create a website
- Extract the Zip to the site root
Configuration
AppSettings
{
“Logging”: {
“LogLevel”: {
“Default”: “Error”,
“Akumina”: “Error”,
“Microsoft.AspNetCore”: “Error”
}
},
“AllowedHosts”: “*”,
“ApplicationInsights”: {
“InstrumentationKey”: “”,
“ConnectionString”: “”
},
“AkAppSettings”: {
“MinWorkerThreads”: “50”,
“LogListener”: “AppInsight”,
“DataHubUri”: “”,
“TenantId”: “”,
“QueryKey”: “”,
“PrimaryRedisConnection”: “”,
“CdnVersion”: “”,
“ImplementationVersion”: “0.0”,
“CachePartitionKey”: “akfe:”,
“FetchUserPropertiesFromSharepoint”: false,
“TemplateUrlPrefix”: “”,
“PeopleSyncProperties”: “Department,UsageLocation,DisplayName,GivenName,objectId,JobTitle,Mail,MobilePhone,OfficeLocation,PreferredLocation,Surname,UserPrincipalName,BusinessPhones,City,State,Country,PostalCode”,
“CacheExpiration”: {
“Default”: “86400”,
“UserContext”: “3600”,
“SiteAccess”: “3600”,
“UserPersonas”: “600”
},
“AdminAccess”: {
“Emails”: “”,
“Groups”: “”
}
},
“AppSettings”: {
}
}
| Key | Purpose |
|---|---|
| Logging | Logging configuration section |
| Logging.LogLevel
Akumina |
Log Level, supported values are Verbose, Debug, Information, Warning, Error, Critical |
| ApplicationInsights | This section is required for tracing |
| ApplicationInsights
InstrumentaionKey |
Instrumentation key from Azure Application Insight |
| ApplicationInsights
ConnectionString |
Instrumentation Connection string from Azure Application Insight |
| AkAppSettings | Akumina app settings |
| AkAppSettings
MinWorkerThread |
Preconfigures the number of min worker threads. DO NOT CHANGE |
| AkAppSettings
LogListener |
Supported values are “AppInsight”, “FlatFile” |
| AkAppSettings
TenantId |
SharePoint TenantId |
| AkAppSettings
QueryKey |
AppManager Query Key |
| AkAppSettings
PrimaryRedisConnection |
Required if you use more than one instance or more than one region.
If you leave this value empty, then the system will write caches into in-memory. |
| AkAppSettings
CachePartitionKey |
It is required if the Redis connection string is configured.
If you share your Redis across multiple applications, this will isolate key specifics to the current website. |
| AkAppSettings
CdnVersion |
Akumina setup and configuration engineer will provide this value |
| AkAppSettings
TemplateUrlPrefix |
Static files hosted URLs (aka SharePoint Akumina Library contents); this can be the same as the headless host.
For more information, refer TemplateUrlPrefix section |
| AkAppSettings
ImplementationVersion |
Required to hard refresh static files from the external origin |
| AkAppSettings
FetchUserPropertiesFromSharePoint |
Default is to read user properties from Directory synced data (aka PeopleSync Data); this may be required based on the attributes needed for your site. For better performance, leave it false (default). |
| AkAppSettings
PeopleSyncProperties |
Values required for directory control. The default values are “Department,UsageLocation,DisplayName,GivenName,objectId,JobTitle,Mail,MobilePhone, OfficeLocation,PreferredLocation,Surname,UserPrincipalName,BusinessPhones,City,State, Country,PostalCode” you can add any user synchronized properties |
| CacheExpiration | CacheExpiration |
| CacheExpiration Default | Default cache interval if specific cache interval is not provided |
| CacheExpiration UserContext | UserContext cache interval |
| CacheExpiration SiteAccess | Site access cache interval |
| CacheExpiration UserPersonas | Persona object cache interval |
| AdminAccess | Admin feature such as /admin/Debug or /admin/sitesettings |
| AdminAccess Emails | Comma separate email address which needs to access debug or site settings |
| AdminAccess Groups | Reserved for future release |
AppSettings – Tenant Configuration UI
With the AppManager release of 6.0, the entire AppSettings can be managed through the KeyVault (System Level Config) using “AppSettings–>ConfigSection” and TenantSettings (Instance Level Config) for all other settings.
- To configure the KeyVault, create the JSON attributes with values using the following format:
{
“Logging”: {
“LogLevel”: {
“Default”: “Information”,
“Akumina”: “Debug”,
“Microsoft.AspNetCore”: “Warning”
}
},
“AllowedHosts”: “*”,
“ApplicationInsights”: {
“InstrumentationKey”: “”,
“ConnectionString”: “”
},
“AkAppSettings”: {
“MinWorkerThreads”: “50”,
“LogListener”: “AppInsight”,
“PrimaryRedisConnection”: “”,
“GraphGroupLimit”: 125,
“TenantId”: “”,
“ConnectionConfig”: {
“RemoteStorageConnection”: “”
}
}
}
2. Copy the Secret URI to headless AppSettings (refer to KeyVault section below) and store the key using AppSettingsSecretUri
3. Navigate to ~/tenant/config to configure the remaining app settings properties
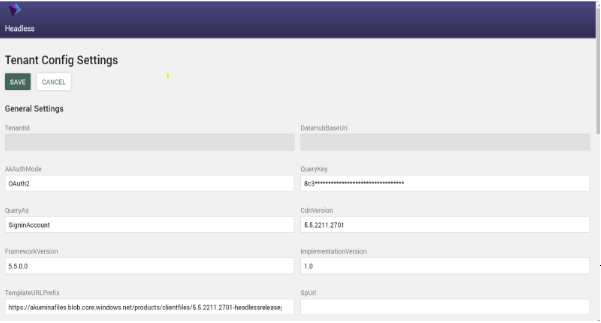
4. After clicking save, the settings will be generated and stored in the following format, which the runtime will load.
{
“AuthMode”: “OAuth2”,
“DataHubUri”: “”,
“TenantId”: “”,
“QueryKey”: “”,
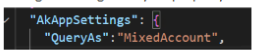
“QueryAs”: “SigninAccount”,
“UseDefaultCredentials”: false,
“SitePrefix”: “sites/”,
“CdnVersion”: “local”,
“FrameworkVersion”: “local”,
“ImplementationVersion”: “0.0”,
“PeopleSyncProperties”: “Department,UsageLocation,DisplayName”,
“FetchUserPropertiesFromSharePoint”: true,
“SiteType”: “Hive”,
“TemplateURLPrefix”: “”,
“DataHubLoginUri”: “”,
“SkipSharePointUserProperties”: true,
“ModernSite”: true,
“CacheExpiration”: {
“Default”: “86400”,
“UserContext”: “3600”,
“SiteAccess”: “3600”,
“UserPersonas”: “600”
},
“AdminAccess”: {
“Emails”: “”,
“Groups”: “”
},
“AppInsightName”: “”,
“TrackingInstrumentationKey”: “”,
“TrackingAppId”: null
}
TemplateUrlPrefix
Add New Azure Storage Container specific for the client (this will be done in the clients Azure)
Public Read
Cors Settings
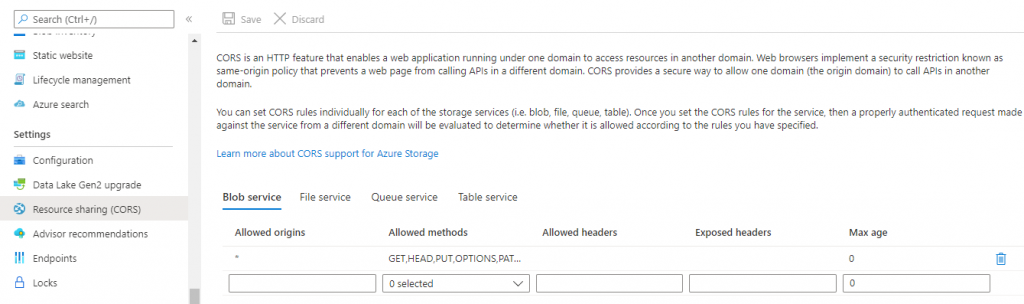
Extract the files and copy them to any storage account, and provide the path in appsettings.json “TemplateUrlPrefix”. You can also extract to the site root if you do not want to host externally. Please note that external hosting may be required for better developer experiences and performance.
Note – If you are using the Akumina Mobile app, then additionally add the DELETE in allowed methods.
KeyVault
The entire “appsettings.json” content can be stored in a key vault secret. This is a preferred approach for high security and easy management when hosting applications in more than one region. To configure the headless web:
- Go to AppService, enable Identity
- Go to KeyVault and setup Access policy
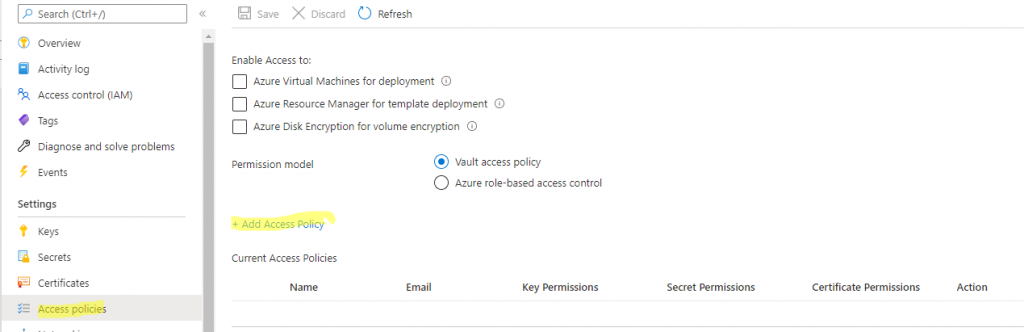
- Enable AppService Identity as Read Access to keys and secret
- Copy the secret Url (without the version)
- For AppServices (Linux or Windows) – Go to configuration then add a key name “AppSettingsSecretUri” and set the value as a secret Uri (without the version).
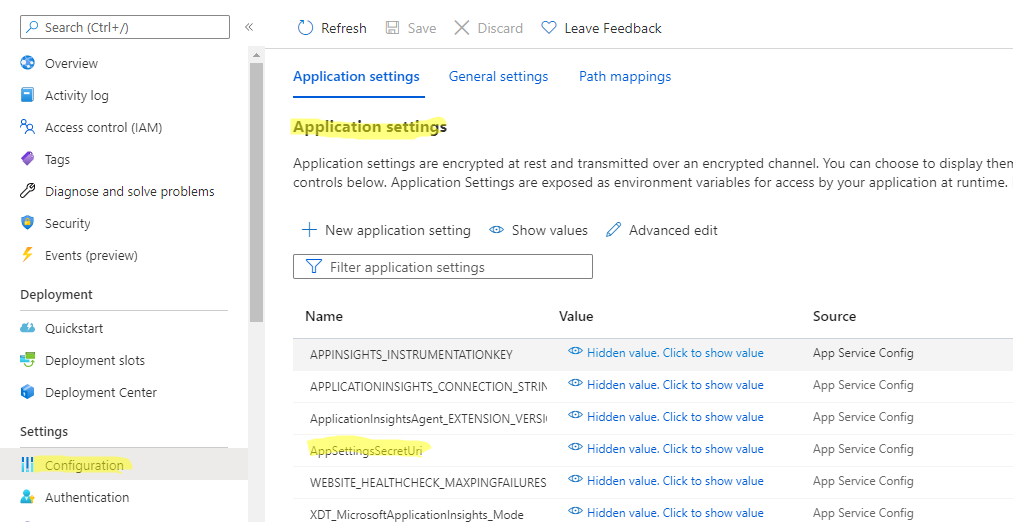
- Stop/Start the web app
Cors
- To enable Cors in AppManager, go to AppManager->Settings->AppSettings->Edit Origin to append the headless URL. (make sure https:// Is Included with no trailing slash)
- TemplateURLPrefix hosted site must also be cors enabled for headless URL
Headless Config
SiteSettings
To load sites in headless, configure sitesettings:
- Navigate to admin/sitesettings
- Add a default site (required)

Vanity URL
Vanity URL Is a concept to add a custom domain to your SharePoint site. When In headless, the default site will have custom DNS, but the other sites will use the same DNS prefix and suffix with “sites/<YOUR SITE>”, using a vanity URL, you can define custom DNS for every suffix “sites/<YOUR SITE>”
Pre-Requisites:
- Define a domain (a subdomain in onakumina.com or any custom domain)
- Update DNS service to have record set
- Update the IIS/Web APP with hostname (host headers)
- Update Front Door entries
- Grant CORS access to the hostname in AppManager
For this reason, it is strongly recommended to have the Headless site and App Manager URL be on the same top-level domain, to prevent such issues with Safari and other browsers.
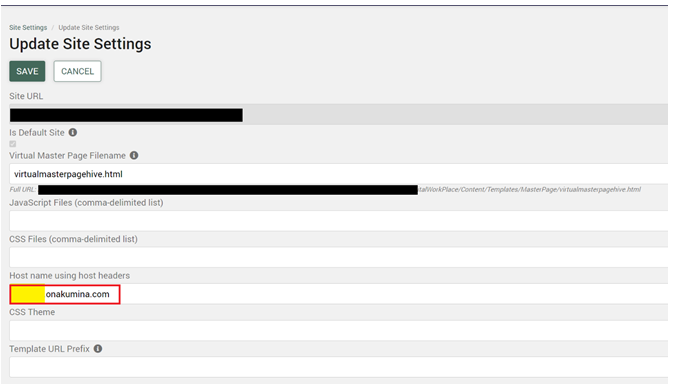
Configuration:
As an admin user, navigate to ~/admin/sitesettings to update the following highlighted section “Host name using host headers”
Debugging
Debugging page is viewable by Admin users (refer AppSettings->AdminAccess). Once you log in as configured admin user, navigate to ~/admin/debug
Front End Storage Configurations
This section explains how to configure the FrontEnd Storage settings In Tenant Config Settings. This configuration is required for the following functionalities when AppManager is running in OAuth/Service-Provider Mode:
- AppManager > Management Apps > View Manager
- FrontEnd View Template Editing
- Site Deployer for deploying the View Templates
Configuration
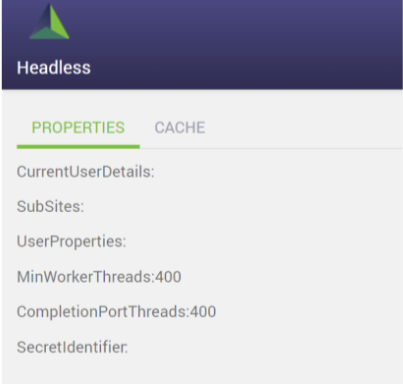
The following section has been added in Tenant Config Settings:

KeyVault Uri OR Storage Connection String
This field is optional and supports either KeyVault Uri or Storage Connection String.
KeyVault Uri
When you are using KeyVault Uri, the ‘TemplateUrlPrefix’ field is not required and it will become disabled.
Make sure you have your configurations stored in the vault in the following format.


| Key | Purpose |
|---|---|
| TemplateUrlPrefix | This is a required configuration which must be specified up to the container name, template prefix is optional.
Valid Examples:
*myfiles is your container name |
| FrontEndStorageConnectionString | This is required and must be a valid Azure Storage Account Access key. |
Storage Connection String
When you are using the Storage Connection String, you must specify the valid Azure Storage Account Access key.
TemplateUrlPrefix
This field is required only when you are using the Storage Connection String. This field is not required when you are either not specifying any value In ‘KeyVault OR Storage Connection String’ or using the KeyVault Uri
Make sure you specify the TemplateUrlPrefix upto container name, following are few valid examples:
- https://[storage-acc].blob.core.windows.net/myfiles
- https://[storage-acc].blob.core.windows.net/myfiles/v1
- https://[storage-acc].blob.core.windows.net/myfiles/v1/fe
*myfiles is your container name
Updating the FrontEndSettings
When you are using the KeyVault Uri for storing the FrontEnd settings make sure you have Health Check enabled on AppManager App Service with the following configuration.
When you update the new KeyVault Uri in Tenant Config Settings, Health check will propagate the changes across the App Service node
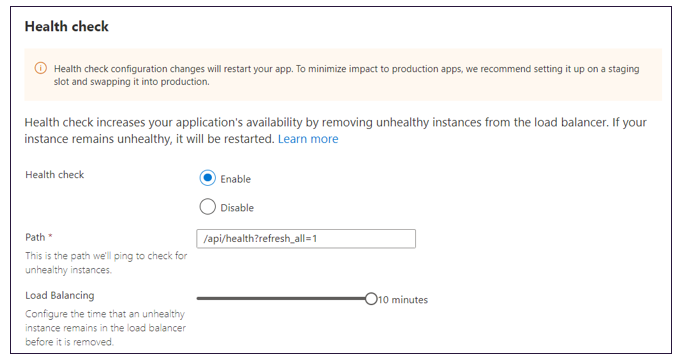
Alternatively, if you don’t want to use the Health Check, you must restart the AppService to reflect the new FrontEnd Settings.
Granting Access to KeyVault
When you configure headless settings into Key Vault, make sure you enable Headless Identity with “Get, List” permissions to Key Vault.
- Enable Identity to Headless Web App (Go to Headless Web App > Identity > Enable)
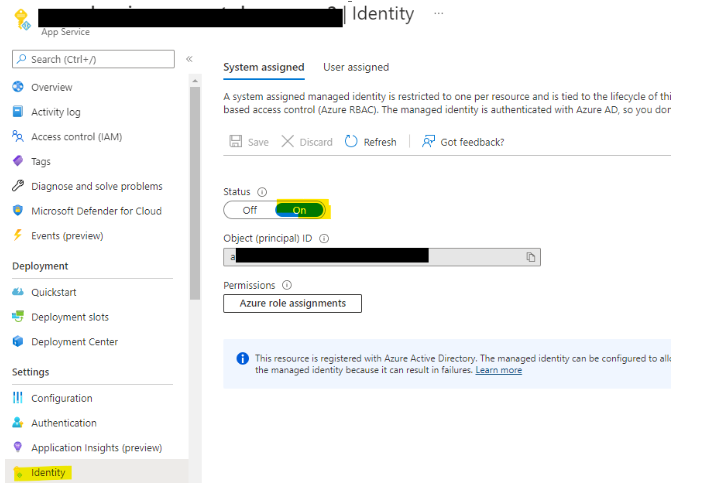
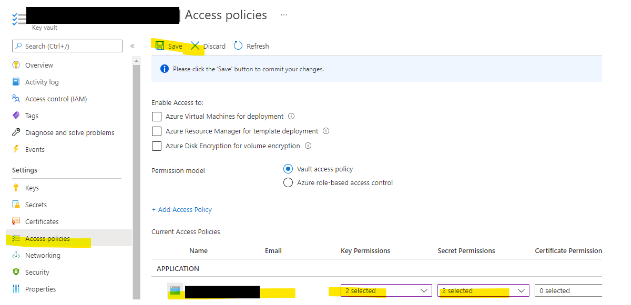
- Copy the value then go to Headless AppSettings Key Vault from the access policies and enable “Get and List” for the above Service Principal.
Manual Configurations
You need to have the site collection admin permission to perform this action on standalone/central delivery.
For the lists below, we need to add the “Everyone” group with “Contribute” permission.
- FormsSubmissions_AK,StepPlannerInstances_AK
And for the lists below, we need to add “Contribute” permission to the “Visitor” group.
- PageWidgetsAK,PageData_AK,WidgetProperties_AK,DashboardDragDrop_AK,AppDisplayOrder_AK ,Comments_AK, MyDashboard_AK,NewIntranetFeedback_AK,IntranetSurvey_AK,NewsComments_AK
Account Mode
Headless offers multiple ways to connect back-end systems. In this case, SharePoint Rest APIs, the supported connection modes are:
- SigninAccount
- ServiceAccount
- MixedAccount
Configured using “QueryAs” property from appsettings.json
SigninAccount
SigninAccount is the Out of the Box Mode, which runs on logged-in users’ delegated access. If the user has access, then returns the data; otherwise, access is denied.
ServiceAccount
In this mode, the logged-in user is different than the user querying the back-end store; In this case, SharePoint Rest Apis. It needs a list of pre-configured username and password credentials or AAD Application secret stored in credentials.json or a key vault URI.
MixedAccount
If your headless needs to evaluate the current users’ license and attach only when the user doesn’t have a license, then It Is the best option. The headless Instance will run a license check and then attaches the context of SiginAccount or ServiceAccount.
For a mixed-mode account, license configuration Is required; otherwise, It will automatically change all users to the service account. To configure the SharePoint license, go to Settings–>TenantSettings, then update the following key with:
cbdc14ab-d96c-4c30-b9f4-6ada7cdc1d46,05e9a617-0261-4cee-bb44-138d3ef5d965,cdd28e44-67e3-425e-be4c-737fab2899d3,b214fe43-f5a3-4703-beeb-fa97188220fc,3b555118-da6a-4418-894f-7df1e2096870,dab7782a-93b1-4074-8bb1-0e61318bea0b,f245ecc8-75af-4f8e-b61f-27d8114de5f3, ac5cef5d-921b-4f97-9ef3-c99076e5470f,18181a46-0d4e-45cd-891e-60aabd171b4e,6634e0ce-1a9f-428c-a498-f84ec7b8aa2e,6fd2c87f-b296-42f0-b197-1e91e994b900,4b585984-651b-448a-9e53-3b10f069cf7f

ServiceAccount Limitations
At this time, the following features are disabled when the headless renders in service account mode:
- Tray Removed (hidden)
- Add Page
- Quick Content Edit
For a complete list of supported and unsupported features click here
ServiceAccount Credential Configurations
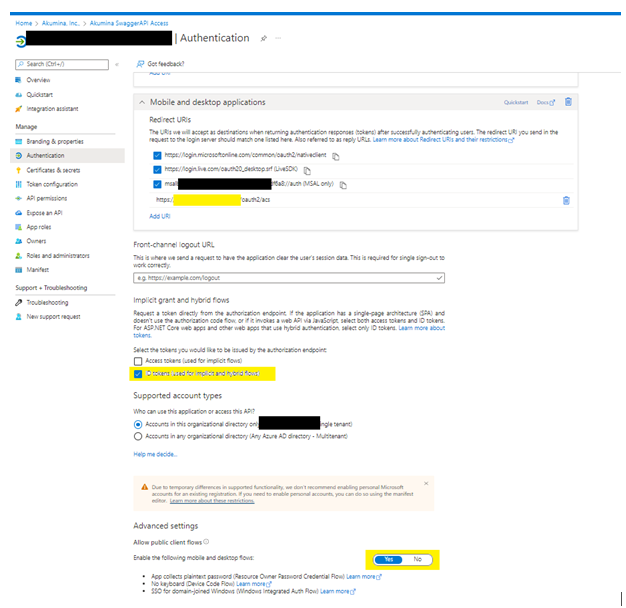
- Navigate to Azure Active Directory and create a new App, then configure it as shown below:
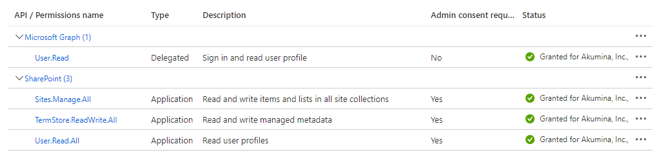
- Permissions required by Service Account Apps (if UseAppId is set to true)
- Create a JSON text in the following format

| UseAppId | Description |
|---|---|
| False | Individual licensed userId/Password sets must be configured as part of the Credential account. Please note Certificate is not required. |
| True | In this case, the [USER ID] is your AppId, and [PWD] is your App Secret.
If a certificate is used, then [PWD] is the certificate password. To avoid throttling, you may need to configure multiple apps; in this case, please use the same certificate and password for all apps. To setup a certificate please refer Creating a Self Signing Certificate – Akumina Community |
- Store them in any file that ends with credential.json (for testing purposes only) or Key Vault Uri. Please note when using Key Vault, there is a size limitation of 254 KB; hence slice the file content into multiple files and refer to them as comma-separated. All files must retain the format.
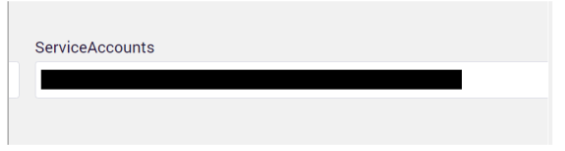
- Go to tenant settings and update the field “ServiceAccounts”
For Key Vault Uri enter the Uri (refer to the previous step)