Please follow the steps one at a time, do not proceed to the next step until the one you are working on has completed successfully.
| Step # | Step | Comments/Notes | Status | |||||||||||||||
| 1 | AppManager URL | |||||||||||||||||
| 2 | Site Collection URL | |||||||||||||||||
| 3 | Install the Akumina Interchange AppManager in Site content | |||||||||||||||||
| 4 | Add logged in user and any other appropriate user to the “Owners” group of the site collection (Site Settings > People and Groups, click on OWNER area to add) | |||||||||||||||||
| 5 | Set Administrator group appropriately in site collection | |||||||||||||||||
| 6 | Navigate to Site Settings > “Site Collection Features”
· Deactivate “Limited-access user permissions lockdown mode” |
|||||||||||||||||
| 7 | Navigate to “Site Contents” and click on the AppManager App – [Note a new browser tab will open and it will take around 20 minutes to deploy the required lists] | |||||||||||||||||
| 8 | Navigate to AppManager and “Settings”, Select Global Settings (pencil) | |||||||||||||||||
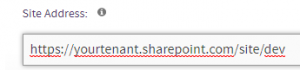
| 9 | Global settings set the site collection URL
There can be no “/” on the end of the URL See this as an example only:
|
|
||||||||||||||||
| 10 | Set SystemEmail – this is not required, and no email notification will be sent unless the client has provided a set of SMTP keys. | |||||||||||||||||
| 11 | Set the “Administrator Group” to the Owners group, this can be updated later | |||||||||||||||||
| 12 | Set “Reporting Access Group” = Site Owners group this can be updated later | |||||||||||||||||
| 13 | SAVE and EXIT GLOBAL SETTINGS | |||||||||||||||||
| 14 | Navigate to “Management Apps” > “Site Creator”, select site: “Digitial Workplace Core Site” or “Digital Workplace Foundation Site (v2)” or “Digital Workplace Foundation Site”
-Set Select an Action = “Create New Installation” – set the Interchange URL to the suggested value (verify no spaces before or after the URL have been entered into the input field) – set “Interchange Query key” copy the value from the suggested value with no spaces before or after the key -Click on Enable Azure AD |
|||||||||||||||||
| 15 | Appid (from Azure Graph App) = Client ID | |||||||||||||||||
| 16 | AAD Client Secret (from Azure Graph App) | |||||||||||||||||
| 17 | Tentant id or Directory ID (from Azure graph App) = Subscription Id | |||||||||||||||||
| 18 | Enter SkypeApiKeyCC (If the site has been configured to use skype) | |||||||||||||||||
| 19 | Enter
SkypeApiKey (If the site has been configured to use skype) |
|||||||||||||||||
| 20 | Logo Image – Change this to the Appropriate Site logo | |||||||||||||||||
| 21 | Select Theme – Set as desired | |||||||||||||||||
| 22 | Enter a Google Map key if traffic is used on your site (this key is acquired by the client via google) | |||||||||||||||||
| 23 | Select “Deploy All” (This will take over 1 hour to Deploy) | |||||||||||||||||
| 24 | Acquire the Akumina Feature Key and turn it on in AppManager > Settings.
Enter the Feature key:
|
|||||||||||||||||
| 25 | If Client has Multilingual key, then enable “Multilingual Feature”
|
|||||||||||||||||
| 26 | If Client has “Microsoft Cognitive Service key” (for Auto Translation) on AppManager > Settings, “Enable Auto-Translate” and enter key
|
|||||||||||||||||
| 27 | If Multilingual is enabled, visit “Management Apps” > “Site Creator”, set select site = “Add Multilingual Support to Existing Site”
And click on “Deploy All”
|
|||||||||||||||||
| 28 | If Multilingual is enabled Navigate to “Management Apps”, “Language Manager” and active languages as appropriate. NOTE: DO NOT DO THIS BEFORE ADDING MULTILINGAL TO SITE IN SITE CREATOR | |||||||||||||||||
| 29 | Navigate to AppManager > Site Settings (dropdown on user profile) and click on the Authentication Token button:
|
|||||||||||||||||
| After deployment has been Complete Configure the site | ||||||||||||||||||
| 30 | Navigate to Site Settings > Search Scheme edit managed Property: LastModifiedTime – Leaving Only Basic:14 – in Mapped to Crawled Properties, and SAVE
See https://community.akumina.com/knowledge-base/foundation-site-installation/ search for: Setting up the Search Schema for the Document Summary List |
|||||||||||||||||
| 31 | Setup Search Scheme for site search:
|
|||||||||||||||||
| 32 | Navigate to Site Settings > Site app permissions, and trust workflow
For specific instructions see this page https://community.akumina.com/knowledge-base/foundation-site-installation/ Scroll down to bottom or search for “Trusting the Workflows Associated with Forms” copy the xml in the left column |
<AppPermissionRequests> <AppPermissionRequest Scope=”http://sharepoint/content/sitecollection/web” Right=”FullControl” /> </AppPermissionRequests> |
||||||||||||||||
| Streams Widget | ||||||||||||||||||
| 33 | If you are using a Streams widget, set the channel appropriately
[{“ChannelName”:”Global Videos”,”ChannelId”:””},{“ChannelName”:”Company”,”ChannelId”:””}] |
|||||||||||||||||
| Step Plan Configuration | ||||||||||||||||||
| 34 | Adding Step Planner to a Site:
Navigate to AppManager > Setting > “Management Settings” (click on pencil) – Click on + – Set app name e.g. “Step Planner” – Select App Type = “Step Planner” – If desired reedit the app and set the permissions to this app Accordingly. |
|||||||||||||||||
| 35 | Create a Step Plan and update a Step Planer Widget instance with the correct plan id see:
https://community.akumina.com/knowledge-base/step-planner-administrators-guide/ for additional information. Add the Step Plan widget to the appropriate page on your site the page must exist in the site in which you created the plan |
|||||||||||||||||
| 36 | Navigate to the front-end page, bring up the debug pane and clear all cache
And do a CNTRL+F5 |
|||||||||||||||||
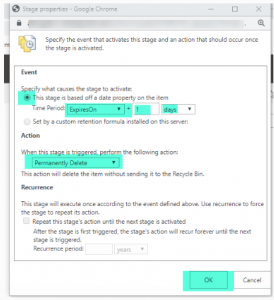
| 37 | Step Plan Manual Configuration use SharePoint Retention Policy
For clients that want to have completed plans deleted automatically, set up a retention policy on the content type so that the plans can be deleted by upon completion automatically by SharePoint. · Navigate to Site Settings > Site Content Types · Select content type = AkuminaStepPlanInstance · Click on the “Information management policy settings” · Click on “Enable Retention” · Click on “Add A retention stage…” Set the following: · Event = “This stage is based off a date property on the item” · Time Period = ExpiresOn + 1 days · Action = Permanently Delete · Click OK (on Edit Policy screen)
|
|||||||||||||||||


References: