Notification Manager
A new Notification Manager management app has been added with Release 5.0 to provide the ability for an authorized user/administrator to configure multi-lingual notifications in a social network with clickable links for redirect to the item, and provides ability for a multi-lingual digest email notification. Notifications can be surfaced to the site notification bell or via email for users.
Understanding the Configuration Screen
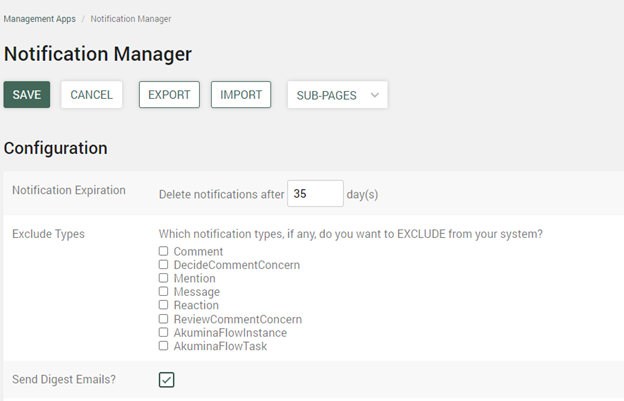
The Notifications configuration screen provides the ability to configure the type of notifications for the organization, import/export notifications, and send digest emails.
- Export: The notifications configurations are downloaded to a .json file and available for local adjustments and import.
- Import: This will import notification configurations from a .json file and open the Notifications Configuration details screen with the imported notification details populated. From here, notification details can be adjusted accordingly.
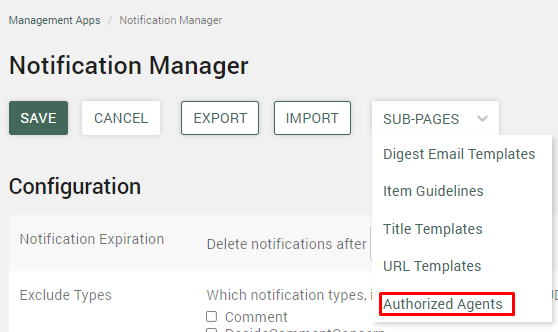
- Sub-Pages: Used to further customize how notifications are received as well as sending digest emails and one-time notifications.
-
- Digest Email Templates: Provides the ability to surface unread notifications to users in a customized email format.
- Item Guidelines: Used to review the social rules configuration setup for a unique items id.
- Title Templates: Title Templates control how notification UI displays in the notification panel on the site and in email digests.
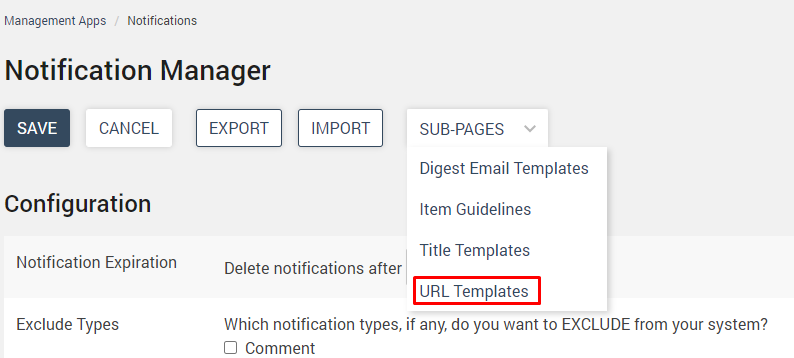
- URL Templates: These templates define how URLs are built when there is or isn’t a content item associated with a notification in order to provide enough data to be able to send a user from a notification to the right place. The primary use case here is in the Email Digest.
- Authorized Agents: Provides the ability to define and authorize third party agents for external notifications.
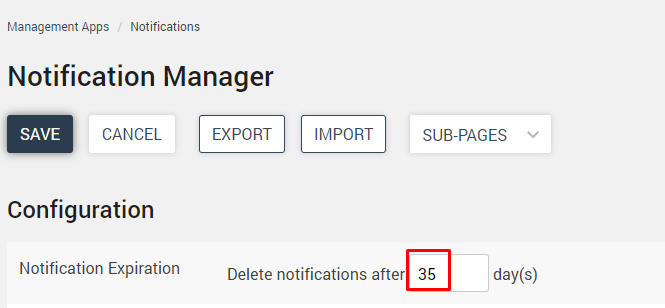
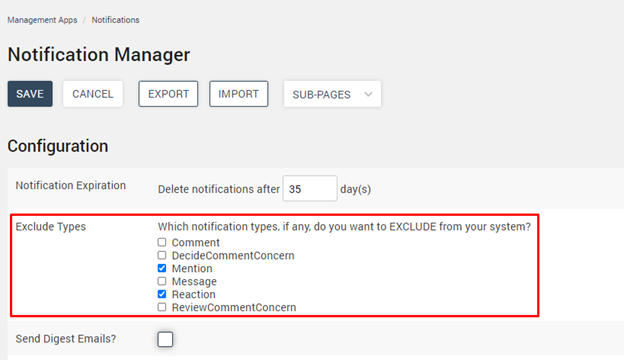
- Notification Expiration: Determines how long included notification types will stay active before they are deleted by the system.
- Exclude Types: Determines which notifications are excluded from the system and will not display to users.
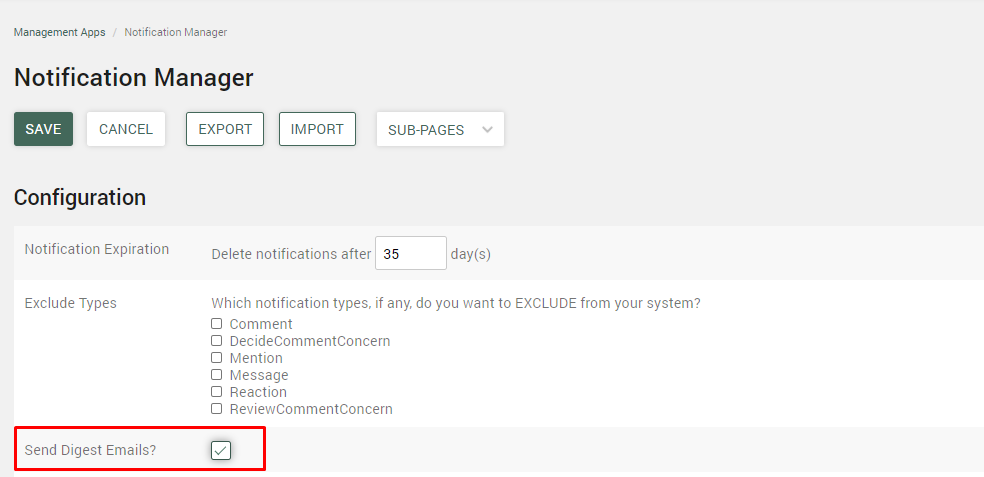
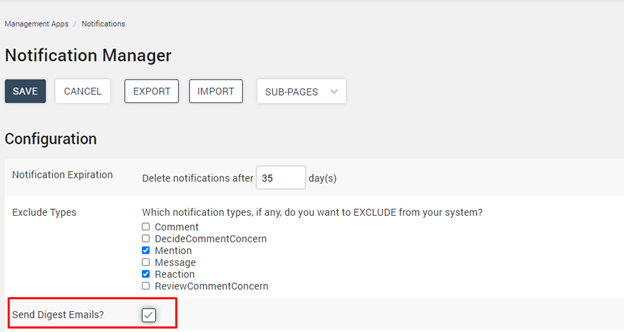
- Send Digest Email: Determines if configured digest emails will be sent to users.
- To set how long to keep notifications in the notification panel for users, set the Notification Expiration field, from 0 to 90 days.
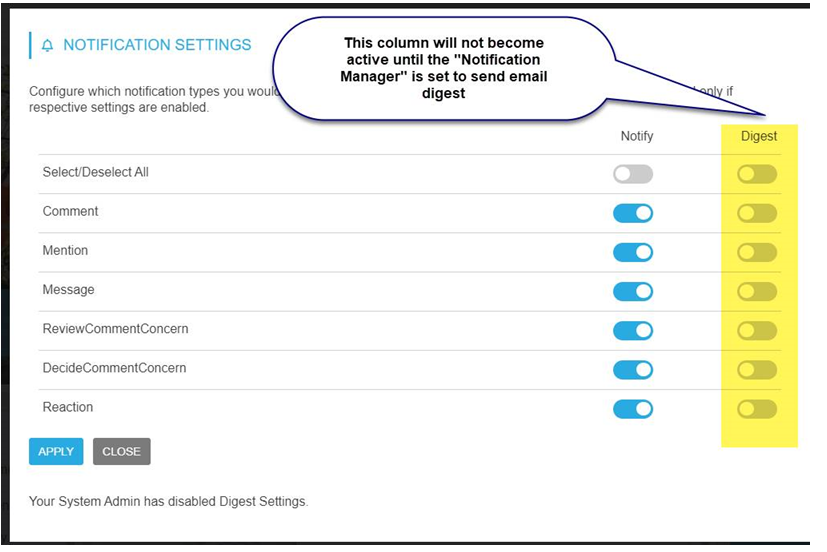
- To exclude types of notifications from showing for users. Select the desired notification(s) for exclusion. In the example below, notifications will not be received when a user uses mentions or reactions.
- Email Digests are set up in the Notification Manager Sub-Pages sections (available once the “Send Digest Emails?” is turned on). The configuration page controls whether to display them to users. If the ‘Send Digest Emails’ box is checked, then users will receive digest emails.
- Clicking save will retain any changes made to the notification configurations.
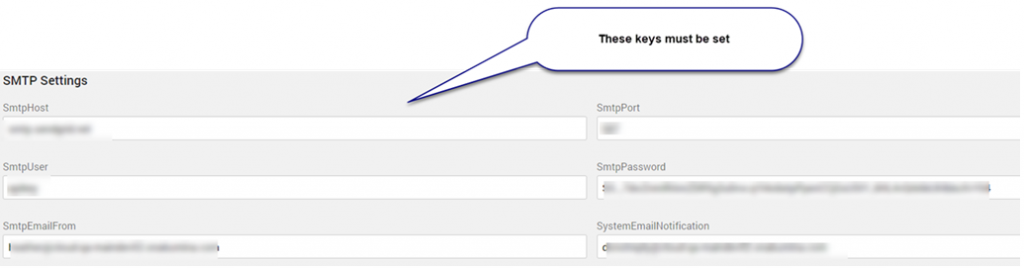
- (1) The SMTP Host keys must be set in SMTP settings > Tenant Settings
-
-
- SmtpUser, SmtpPassword, SmtpHost, SmtpPort, SmtpUseSsl: required for connection
- SmtpEmailFrom: used as “From” address in email
- If provided supports format name||address as in “Acme Inc||acme.com”
- if “||” not provided then uses single value as both name and address
- if not provided; uses “DoNotReply||DoNotReply@akumina.com“)
- If provided supports format name||address as in “Acme Inc||acme.com”
-
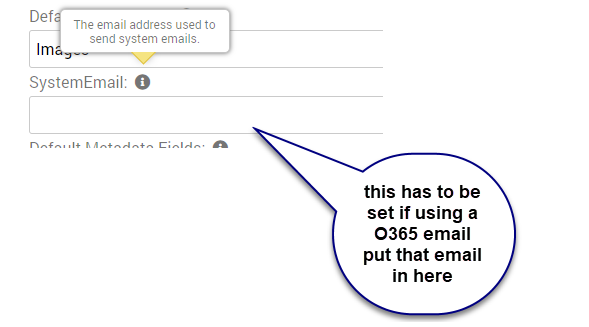
- (2) For O365 user accounts, the email address must be established in Global settings.
- The digest column in notification settings will only be active on the front end if the the ‘Send Email Digest’ is checked in Notification Manager and the initial steps above are complete. Each user will be able to configure their email digest. At the customer level, the site can be configured for the types of notifications the site will support.
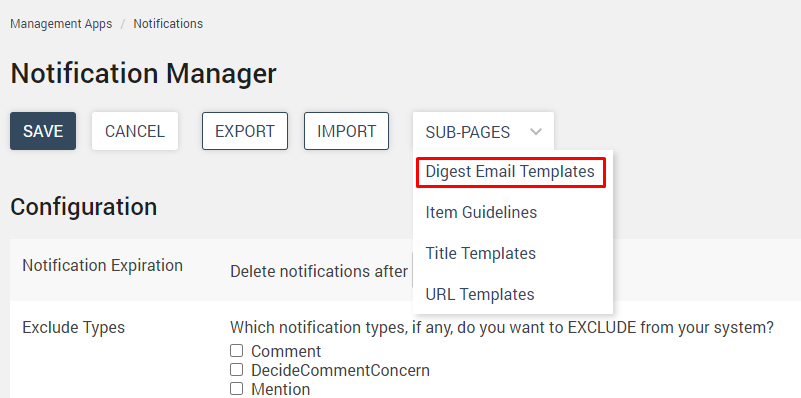
Working with Notification Sub-Pages
Digest Email Templates
The Notification Digest Email Templates provides the ability to surface unread notifications to users in a customized email format.
- To access the Digest Email Templates configuration screen, click Digest Email Templates in the Sub-Pages dropdown menu.
-
- The Digest Email Templates option will only be available if the ‘Send Digest Emails?’ box is checked.
- The following actions can be taken on the Digest Email Templates Screen.
-
- Save: This will retain any changes that have been made to the digest email. If the digest email is active, then those changes will show up for users the next time they receive the digest email.
- Send Test Email: Provides the ability to send a test digest email to a user.
- Export: Clicking export will save a .json file of the digest email. This provides the ability to change the Digest Email Template and retain a copy of one that can be used in the future.
- Import: Ability to import a downloaded Digest Email Template .json file to replace the current template.
- Digest Email Templates will use the following fields to build the email.
-
-
- Select Language: Displays the Digest Email for the specified language.
- Subject: Used to display in the email subject line.
- Body: The body of the email digest uses tokens to automatically replace the token with the associated text as well as regular text, all of which are used to create the email template.
-
-
-
- The tokens and regular text will display in the email, based on where they are placed in the body field.
- Token Definitions can be added to the body of the email digest by clicking the + next to the desired token.
-
-
-
-
- {{EarlierNotifications}}: List of unread notifications before yesterday.
- {{LastSentDate}}: This displays the date the last email digest was sent.
- {{PreferencesURL}}: A URL link that will take users to a settings page, where they can modify their email digest preferences.
- {{Recipient.Name}}: The name of the user that will receive the email digest.
-
-
-
-
-
- {{Subject}}: The value entered in the Subject field.
- {{TodaysNotifications}}: List of today’s unread notifications.
- {{UnsubscribeUrl}}: A URL link that will take the user to a page where they can unsubscribe from the email digest.
- {{YesterdaysNotifications}}: List of yesterday’s unread notifications.
-
- Show Preview: Loads a preview of what the email digest subject and body will look like when a user receives it.
- Restore Default: Restores the template back to the original system defaults.
-

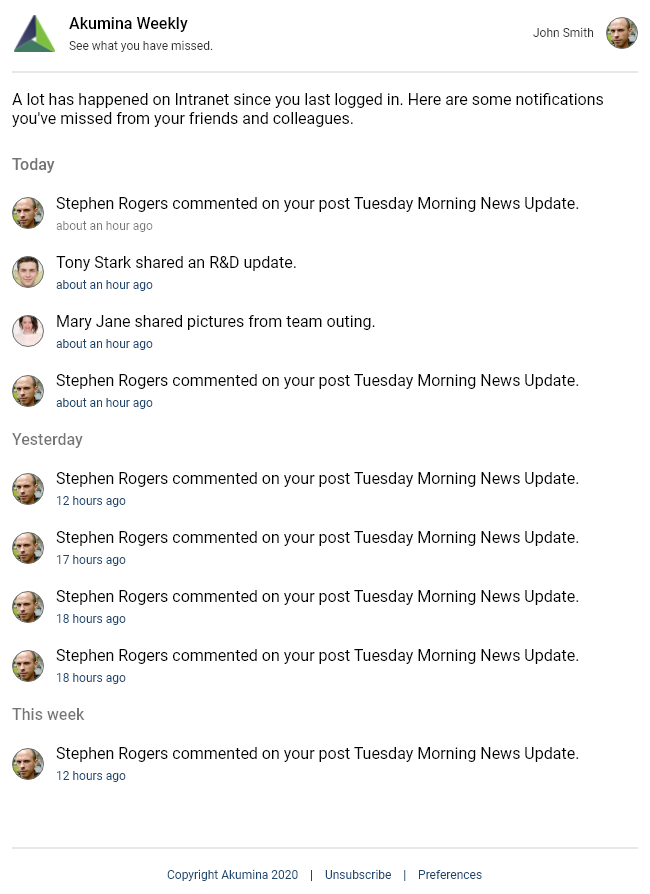
- Below is an example of a digest email received by a user.
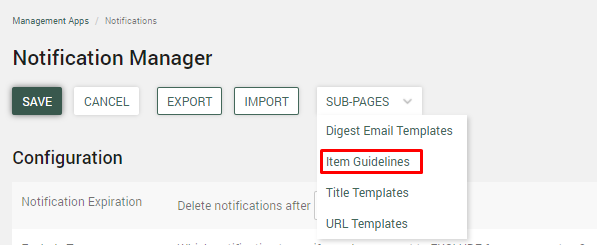
Item Guidelines
Item Guidelines can be used to review the social rules configuration setup for a unique item id. Social rules are configured within a Content App. Click here for details on configuring the social rules of an activity stream with a Content App.
- To access the Notification Item Guidelines screen, click Item Guidelines in the Sub-Pages dropdown menu.
- To lookup an existing item guidelines, you must enter the unique item ID.

- Item Guidelines screen will display how the Social Rules are configured for a particular item. This can also be viewed in the social tab of the Content App.
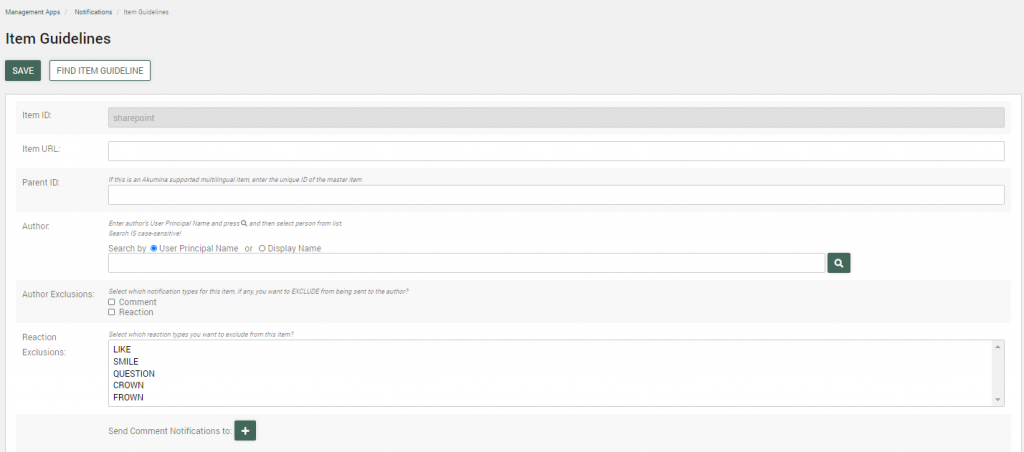
-
- Item ID: Unique Item ID of the item.
- Item URL: Static URL of the item.
- Parent ID: Unique ID of the master item.
- Author: Name of the associated person for the particular rules. For example, a ghost writer may opt out of seeing all comments and reactions, where the actual author would want to see all relevant comments and reactions.
- Author Exclusions: Notification types for this item, if any, to EXCLUDE from being sent to the author. If checked, the notification type will not display for this item.
- Reaction Exclusions: Reaction types to EXCLUDE from this item. Reaction types are populated from the reaction manager.
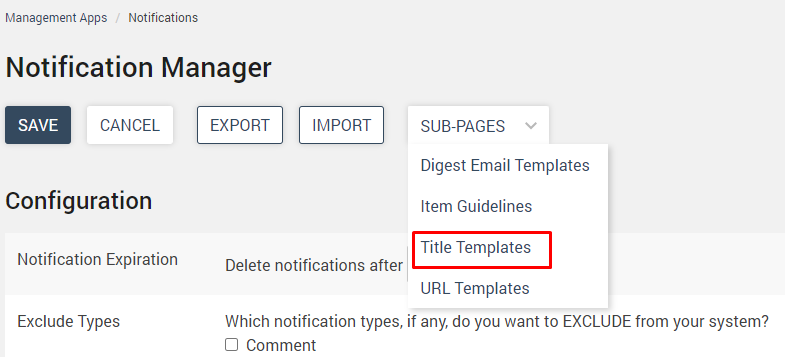
Title Templates
Title Templates control how notification titles display in the notification panel and email digests. They are built to work with multilingual and configured on the Notification Title Templates screen.
- To access the Notification Title Templates screen, click Title Templates in the Sub-Pages dropdown menu.
- The following actions can be taken for the Notification Type. This is the section of the screen that will build the how the notification will appear in the notification panel and email digest.
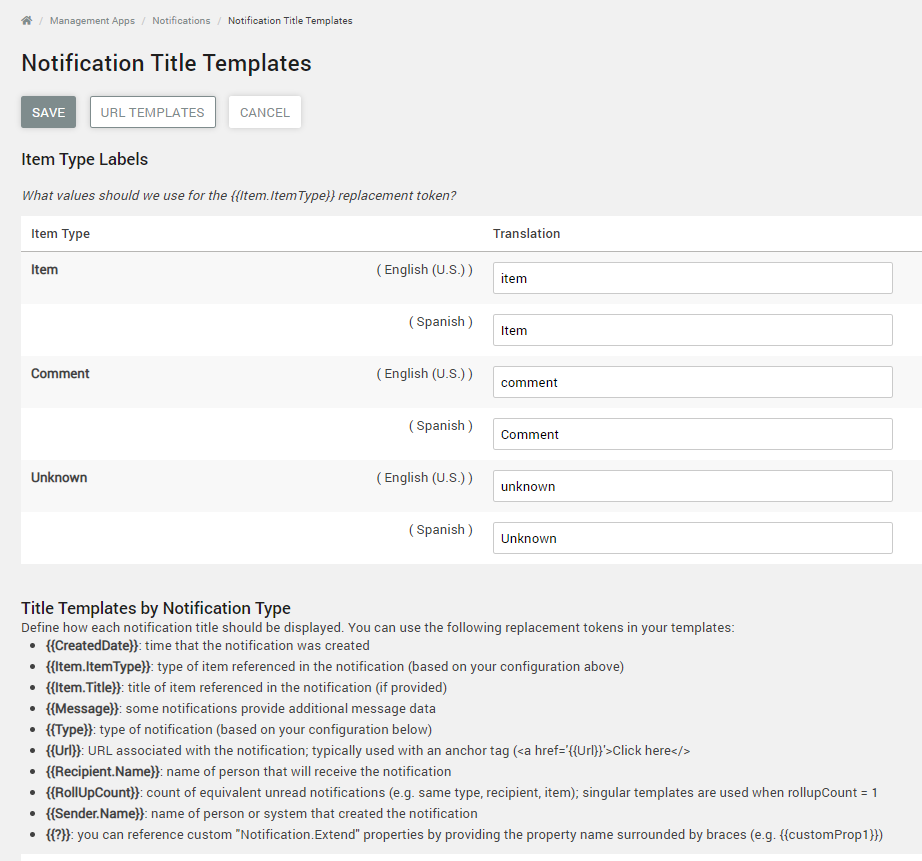
- Each notification template uses replacement tokens to build the notification. The replacement tokens below get replaced with a value that then gets surfaced to the notification for the user.
-
- {{CreatedDate}}: time that the notification was created
- {{Item.ItemType}}: type of item referenced in the notification (based on your configuration above)
- {{Item.Title}}: title of item referenced in the notification (if provided)
-
- {{Message}}: some notifications provide additional message data
- {{Type}}: type of notification (based on your configuration below)
- {{Url}}: URL associated with the notification; typically used with an anchor tag (<a href='{{notificationUrl}}’>Click here</>
- {{Recipient.Name}}: name of person that will receive the notification
- {{RollUpCount}}: count of equivalent unread notifications (e.g. same type, recipient, item); singular templates are used when rollupCount = 1
- {{Sender.Name}}: name of person or system that created the notification
- {{?}}: Reference custom “Notification.Extend” properties by providing the property name surrounded by braces (e.g. {{customProp1}}). These are custom notification properties passed in by the caller.
- The following is a list of notification templates that can be built.
-
- Comment
- Mention
- Message
- ReviewCommentConcern
- DecideCommentConcern
- Reaction
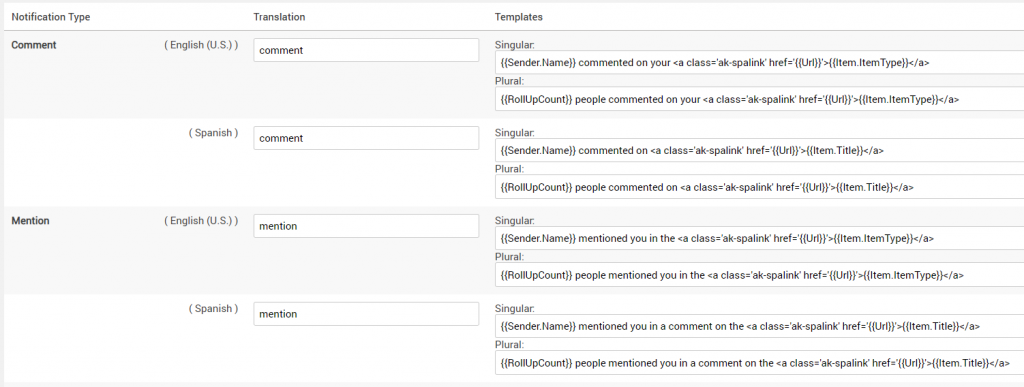
Building a Comment Template Notification
The Comment Template will be used to build the title for “Comment” notifications. In a multilingual site, there will be multiple rows for each notification type, and the translation column will show the different languages that are available for translation, via replacement tokens.
- In the comment Notification Type, three tokens have been placed in the Singular field (senderName, notificationUrl, and itemType). Each of these fields will be replaced with values when a notification is triggered.
- Regular text can be entered anywhere in the template.
- IE: {{SenderName}} commented on your <a href = {{URL}} class=’ak-spalink’>{{Item.ItemType}}</a>

- The above title template will translate to the following for users on the site and in their email digest.
- {{Sender.Name}} – gets replaced with the user’s name or the system name that generated the notification
- {{Item.ItemType}} – The type of item referenced from the notification.
- {{Url}} – URL to the original notification post

- Once the desired Title Template is built, click save, and the changes will reflect the next time a user receives a notification or digest email.
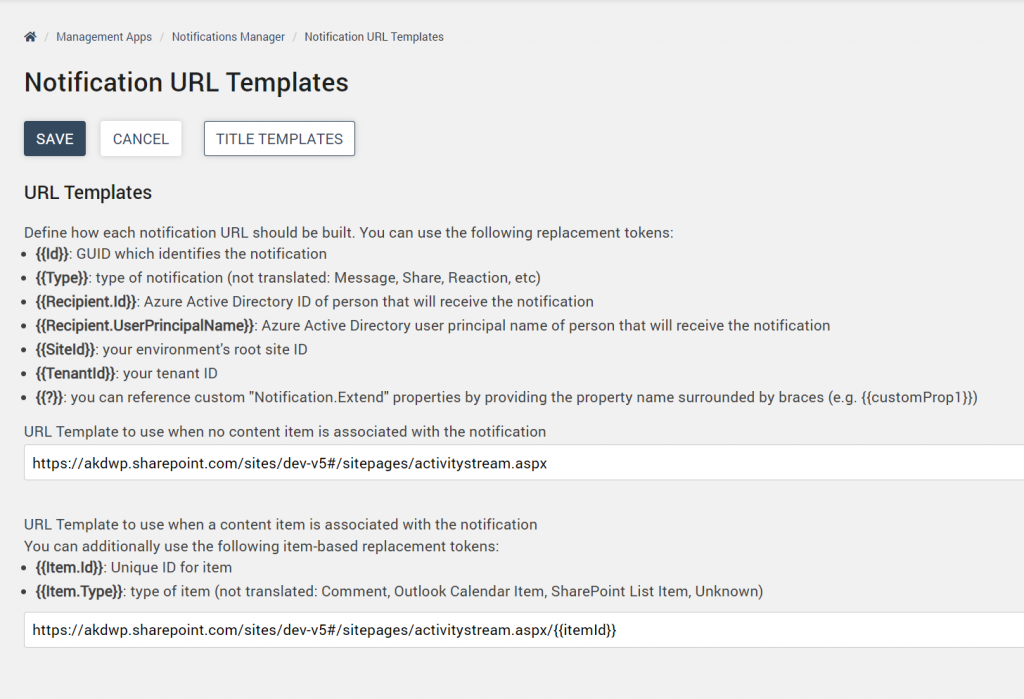
URL Templates
These templates define how URLs are built when the author of the notification doesn’t provide a URL. The primary use case is for the Email Digest.
- To access the Notification URL Templates screen, click URL Templates in the Sub-Pages dropdown menu.
- The following actions can be taken to define how each notification URL is built.
- Each Notification URL template uses replacement tokens to build the notification URL. The replacement tokens below get replaced with a value. The URL along with these values comprise of the URL notification.
-
- {{Id}}: GUID which identifies the notification
- {{Type}}: type of notification (not translated: Message, Share, Reaction, etc)
- {{Recipient.Id}}: Azure Active Directory ID of person that will receive the notification
- {{Recipient.UserPrincipalName}}: Azure Active Directory user principal name of person that will receive the notification
- {{SiteId}}: your environment’s root site ID
- {{TenantId}}: your tenant ID
- {{?}}: Reference custom “Notification.Extend” properties by providing the property name surrounded by braces (e.g. {{customProp1}}). These are custom notification properties passed in by the caller.
- {{Item.Id}}: Unique ID for the item
- {{Item.Type}}: type of item (not translated: Comment, Outlook Calendar Item, SharePoint List item, Unknown)
Building a URL Template
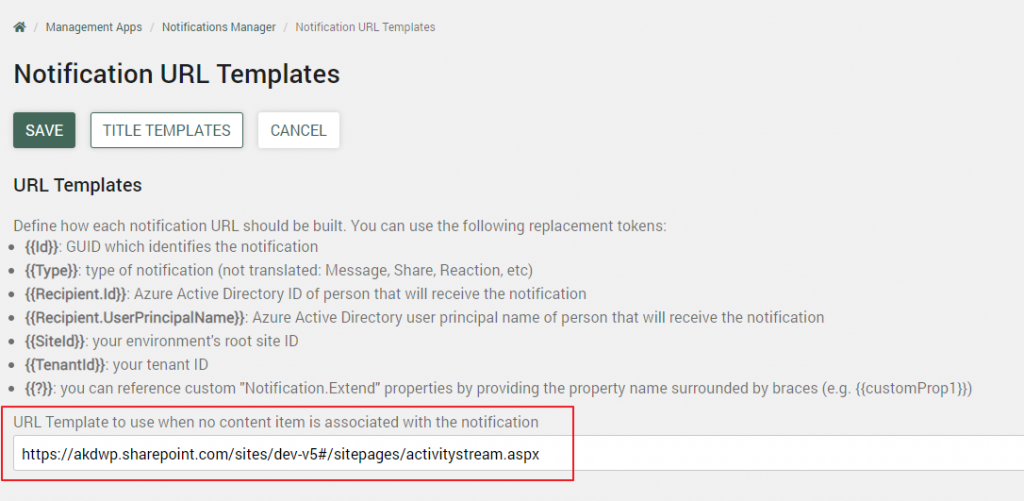
- To build a Url template when a notification is not associated with an item.
- Add the desired Url to the field.
- Click Save and the changes will reflect the next time a user receives a digest email or notification.
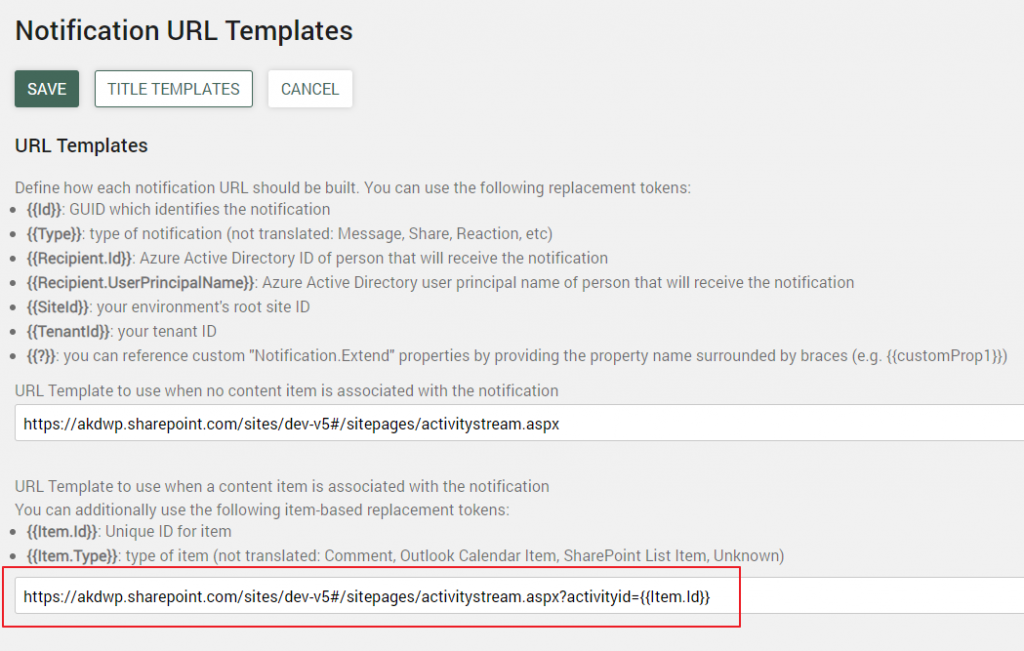
- Build a URL template for when a content item is associated with a notification.
- Add the desired Url to the field.
- Add desired replacements tokens to the end of the Url.
- Click Save and the changes will reflect the next time a user receives a digest email or notification.
External Notifications for Authorized Agents
The Notification Authorized Agents provides customers with the ability to authorize third party agents, such as Service Now, to be integrated into the notification bell to enable corporate wide multi-lingual notifications for the site.
- To access the Notification Authorized Agent screen, click Authorized Agent in the Sub-Pages dropdown menu.
- The following actions can be taken on the Authorized Agents screen.
- Save: This will retain any changes that have been made to the existing authorized agent setup. If the authorized agent is active, then those changes will show up for users the next time they receive the external notification.
- Add Agent: Provides the ability to define and authorize external agents for the site and define the supported notification types for the agent.

- To add a new external agent to authorize to push notifications to the Akumina Notification system. Click on add agent and complete the following information.

- Name – Enter a unique name for the authorized agent.
- Authorization Code – Enter a unique code used to authorize the agent calls to the Akumina API. This unique code will be used as an authorization token to authorize external notification requests.
- Supported Notification Types – Click on all the notification types that are authorized for this agent.