Determine if this SharePoint Site has an App Catalog Already Setup
- On SharePoint Central Administrator page, Left Column, select “Apps”.

- The “Apps” page will be displayed, click on “Manage App Catalog”.

- Set the “Web Application” from the dropdown to the “web application” that AppManager will be added as an app.

If the App Catalog exists, then skip to the “Creating an App Identifier” Section. If not proceed to the next section.
If the App Catalog is NOT Configured for the Appropriate Site, then:
- Click on “Central Administration” (left Column).
- Under “System Settings” Click “Manage services on server”

- You will be directed to the “Services on Server” page
- On the Services on Server page verify that the AppManagement Service status is “Started”.

- On the Left Menu, under “Central Administration” Click on “Apps”.
- Creating an App Catalog
- On the Apps page, click on “Manage App Catalog”.

- On The “Create App Catalog” page, use the table below to fill in the Fields and then click OK.
Input Field Description Example Title App Catalog Name apps Web Site Address The dropdown should have SITE selected, complete the URL by entering “apps” apps User Name Using the People picker select an Administrator for this catalog. Remember this user, they will manage the app Catalog. Usually this SharePoint administrator End Users Everyone Everyone can see the App Catalog items.  SAVE to NotePad – SharePointSiteAppCatalogURL – You will need this URL to create the Client ID and Secret.SAVE to Notepad –– This will be the Primary administrator listed above, this user will be need to add apps to the site and register the New App with the site.
 - Your App Catalog will now be created.
Configuring your App Catalog
| Term | Description | Example |
|---|---|---|
| Webapplication Domain | <yourDomain> | Sp13dev1 |
| Farm Administrator | <domain\username>” | dev\sharepoint |
Copy the Cmdlets below into a Note Pad file on your SharePoint Hosting Server. Edit the highlighted items in yellow. After the commands have been updated copy them into a “SharePoint 2016 Management Shell” Running as Administrator.
NET START SPADMINV4
[LINEBREAK]
NET START SPTIMERV4
[LINEBREAK]
SET-SPAPPDOMAIN “<YOURDOMAIN>”
[LINEBREAK]
GET-SPSERVICEINSTANCE | WHERE{$_.GETTYPE().NAME -EQ “APPMANAGEMENTSERVICEINSTANCE” -OR $_.GETTYPE().NAME -EQ “SPSUBSCRIPTIONSETTINGSSERVICEINSTANCE”} | START-SPSERVICEINSTANCE
[LINEBREAK]
$ACCOUNT = GET-SPMANAGEDACCOUNT “<DOMAIN\USERNAME>”
[LINEBREAK]
$APPPOOLSUBSVC = NEW-SPSERVICEAPPLICATIONPOOL -NAME SETTINGSSERVICEAPPPOOL -ACCOUNT $ACCOUNT
[LINEBREAK]
$APPPOOLAPPSVC = NEW-SPSERVICEAPPLICATIONPOOL -NAME APPSERVICEAPPPOOL -ACCOUNT $ACCOUNT
[LINEBREAK]
$APPSUBSVC = NEW-SPSUBSCRIPTIONSETTINGSSERVICEAPPLICATION –APPLICATIONPOOL $APPPOOLSUBSVC –NAME SETTINGSSERVICEAPP –DATABASENAME SETTINGSSERVICEDB
[LINEBREAK]
$PROXYSUBSVC = NEW-SPSUBSCRIPTIONSETTINGSSERVICEAPPLICATIONPROXY –SERVICEAPPLICATION $APPSUBSVC
[LINEBREAK]
$APPAPPSVC = NEW-SPAPPMANAGEMENTSERVICEAPPLICATION -APPLICATIONPOOL $APPPOOLAPPSVC -NAME APPSERVICEAPP -DATABASENAME APPSERVICEDB
[LINEBREAK]
$PROXYAPPSVC = NEW-SPAPPMANAGEMENTSERVICEAPPLICATIONPROXY -SERVICEAPPLICATION $APPAPPSVC
[LINEBREAK]
SET-SPAPPSITESUBSCRIPTIONNAME -NAME “APPS” -CONFIRM:$FALSE
[LINEBREAK]
Below is an example of an edited set of commands to copy and paste into a Managed Power Shell.![]()
Configuring App URLs for your app catalog.
In SharePoint 2016 Central Administration
Left column, click on “Apps”.
Click on “Configure App URLs”.
The “Configure App URLs” page will be displayed.
Note: If you do not see the input fields described below then you will need follow these sets:
Navigate to “Application Management” > “Manage Service Application” (under Service Applications).
Verify that “Subscription Settings Service” is listed and is “Started”.
There are two input fields on this page which maybe already populated CLEAR both Fields and fill them in appropriately as described in the table below.
| Input Field | Description | Example |
|---|---|---|
| App domain | Enter in the App Domain | sp13dev1 |
| App prefix | Fill in the App prefix. It is best to use something short like “Apps” | Apps |
Once the fields are completed, click on OK.
Creating an App Identifier for AppManager
A Client Identity and Client Secret must be created for the new incoming APP – AppManager. AppRegNew.aspx will be used to generate those items.
- Login as Administrator onto your SharePoint Admin Center.
- Click On apps in left column.

- Click on App Catalog.

- Navigate to http://<SharePointAppCatalogURL>/_layouts/15/AppRegNew.aspx.
- The App Information page will be displayed, where input field to create the Client Identity will be displayed:
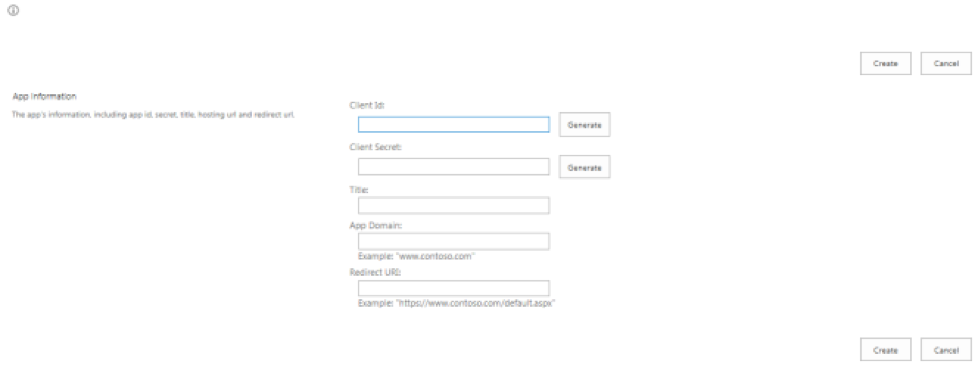
Set the following fields:
- Client Id: – Click the Generate button and SharePoint will generate the Client ID.
- Client Secret– Click the Generate button and SharePoint will generate the Client Secret.
In the example below the redirect for the appmanager website is: https://myappmanager.onakumina.com. The domain is the redirect without the https example: myappmanager.onakumina.com
- TITLE – Is usually the domain of your AppManager plus a client secret expiration date (one year from the generation of this secret, which is what we are doing right now). The “TITLE” is the app title seen in “Site Settings” > “Site app permissions”. Example:
myappmanager.onakumina.comExp071720 - App Domain – Domain example:
myappmanager.onakumina.com - Redirect URI – The endpoint in your remote application “AppManager” (website). This must be of the form https://DomainName. Example:
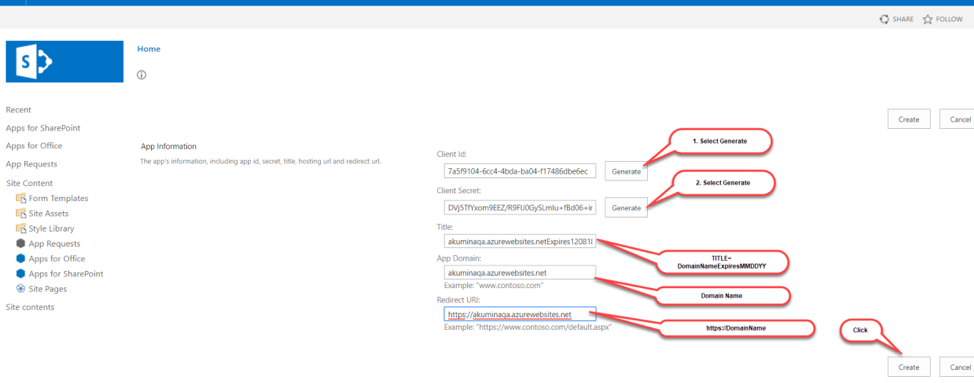
Click the “Create” Button
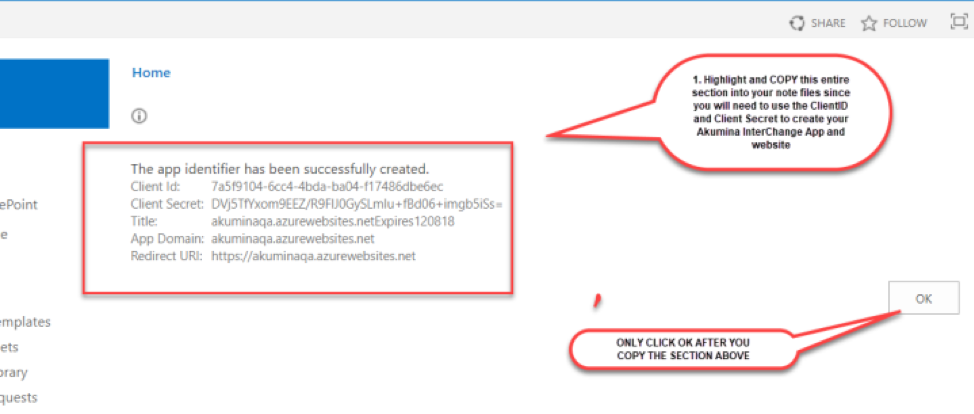
- Verify that the Identifier was generated successfully.
- Click on OK button