Define the tasks that complete the process.
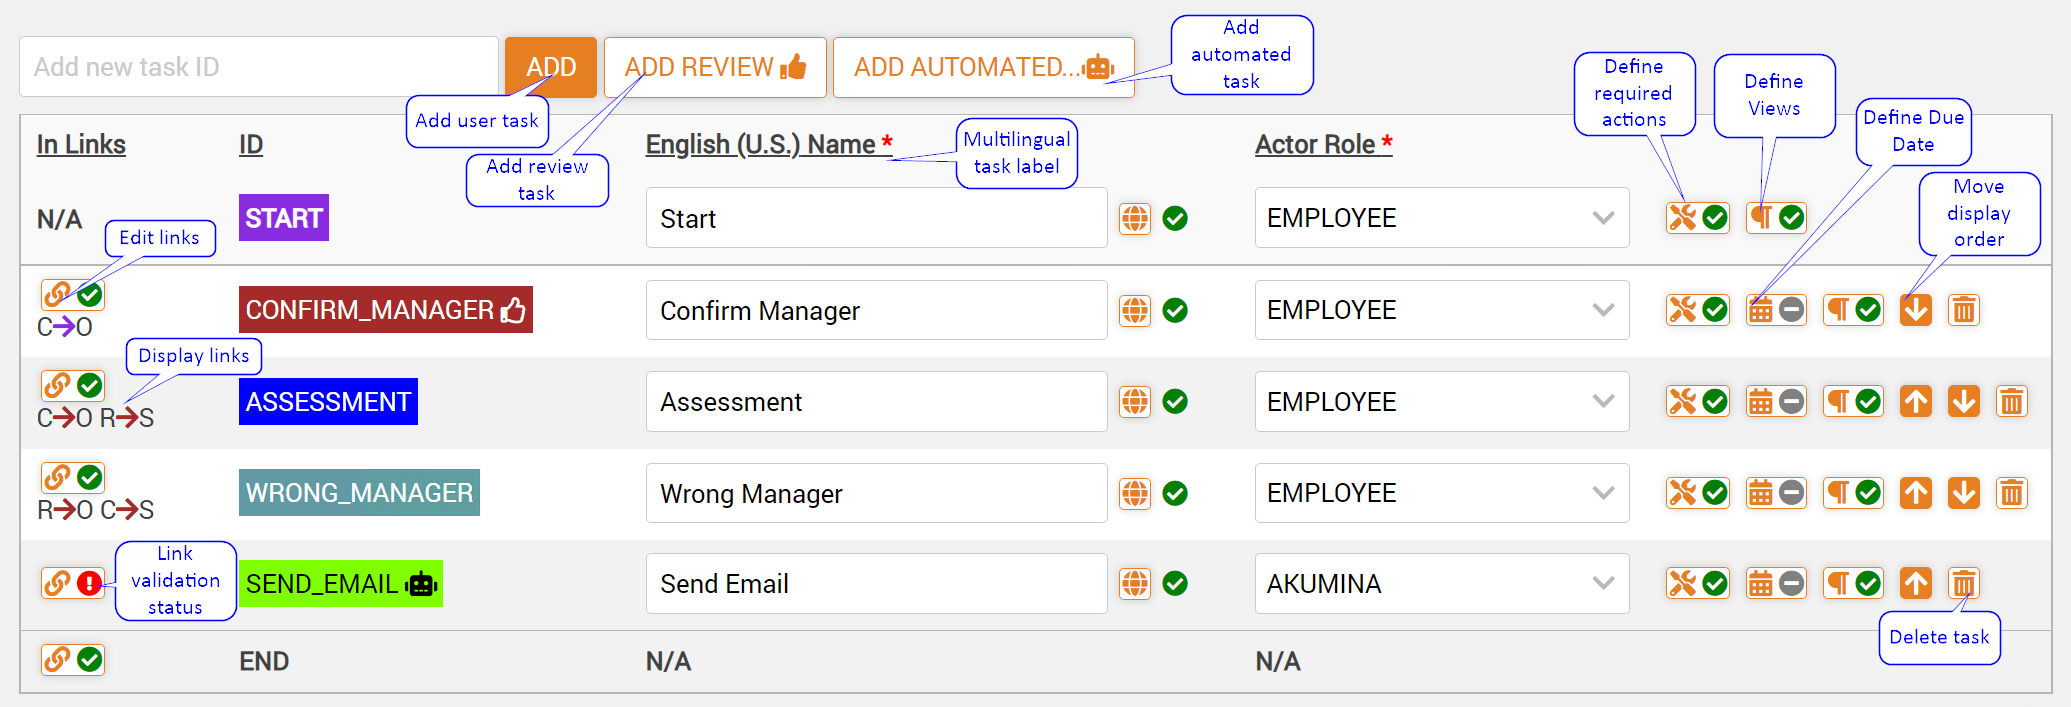
There are 3 types of tasks:
- User Task
- A task which is assigned to and worked by an authorized user that belongs to the associated Role.
- Review Task
- A task which is assigned to and worked by an authorized user that belongs to the associated Role. Differs from a User Task in that the task completion has 2 paths: Approve and Reject.
- Automated Task
- A task which is assigned to and worked by an external agent that belongs to the associated Role. You will be prompted to select an existing automated task for this task. Automated tasks can be created on the Automated Tasks Page
Every process has a “START” and “END” task. The “START” task is a user task that is presented when creating an instance of the process. It has no incoming links since it is always the first task in a process. The “END” task provides a single point for terminating a process.
Task Status
When an instance of the process is created, each Task begins with an initial status of “Waiting”.
- Waiting
- Initial task state. Waiting to be opened. Valid next status values are Open and Skipped
- Open
- Means the task is being, or ready to be, worked. Valid next status values are Completed (or Rejected if this is a Review Task) and Skipped
- Completed
- Means the task has been completed successfully. Valid next status value is Open (e.g. Requires rework)
- Rejected
- Means the review task has completed with a “Rejected” review. Valid next status value is Open
- Skipped
- Optional path that is not used
In Links
A task status is changed either directly when a user completes the work on a task or indirectly as a result of defined links. A task link/dependency defines task status changes that should occur as a result of another task status change.
![]()
So in the example above, the link defines that when the “START” task status changes to “Completed” the “CONFIRM_MANAGER” task status should be changed to “Open”.
A process instance is marked as completed when either:
- there are no tasks in the “Open” status
- or an incoming link sets the “END” task to a Completed status
So you have to define an incoming link for each task (except for START and END)
Task Name
Provide a multi-lingual label for each task. If you have the auto-translate license enabled, the globe icon button will auto-translate the label to the currently selected language.
Actor Role
Who can work this task? User and review tasks are worked by authorized users. The selected role identifies who the authorized users can be. Refer to Akumina Flow Roles Page for more information on how to use roles.
Task Actions
What actions does the assigned user need to complete for this task? Click on the Task Actions button
![]() to bring up the “Task Actions” modal.
to bring up the “Task Actions” modal.
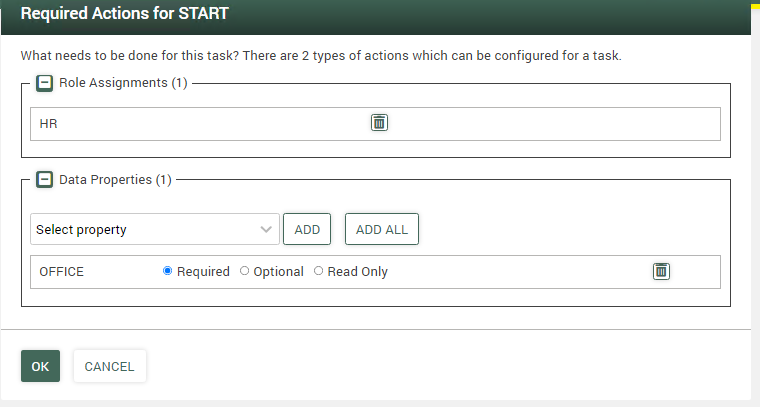
There are 2 types of actions that can be required to complete a task.
- Role Assignments
- Require the assignee to select the user who should be assigned to work following tasks. The selection is by role. Note that all unassigned tasks in this process that are assigned to this role will be assigned to the provided user.
- Data Properties
- Indicate which data properties should be included in this task. Properties can be made available to this task either for:
- Viewing – “Read Only”
- Editing – Either as required or optional fields
Task Due Date
Should this task be completed within a specified time period? If so, configure a due date. Select ![]() to set due dates.
to set due dates.
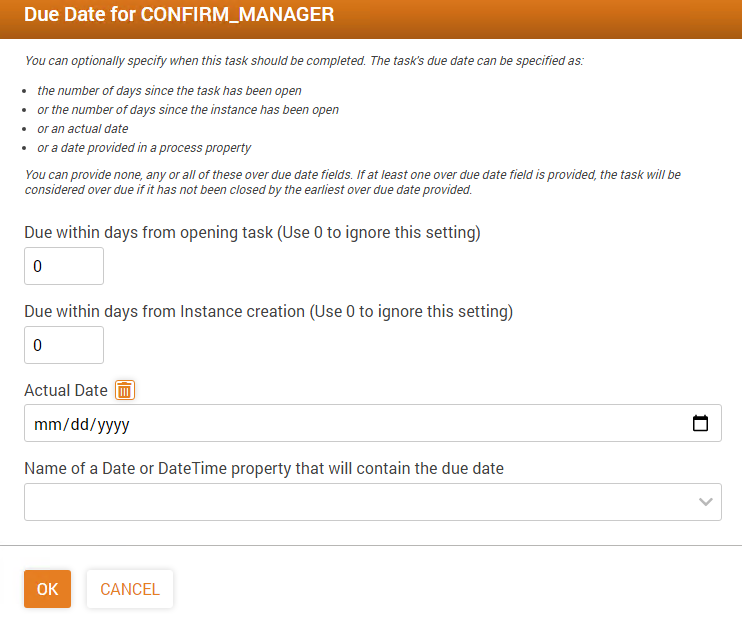
There are 4 ways to define a task due date. Use none, any or all of the methods provided. If at least 1 due date is provided, the earliest of all of the configured due dates will be used. Reporting and notifications use due dates if provided.
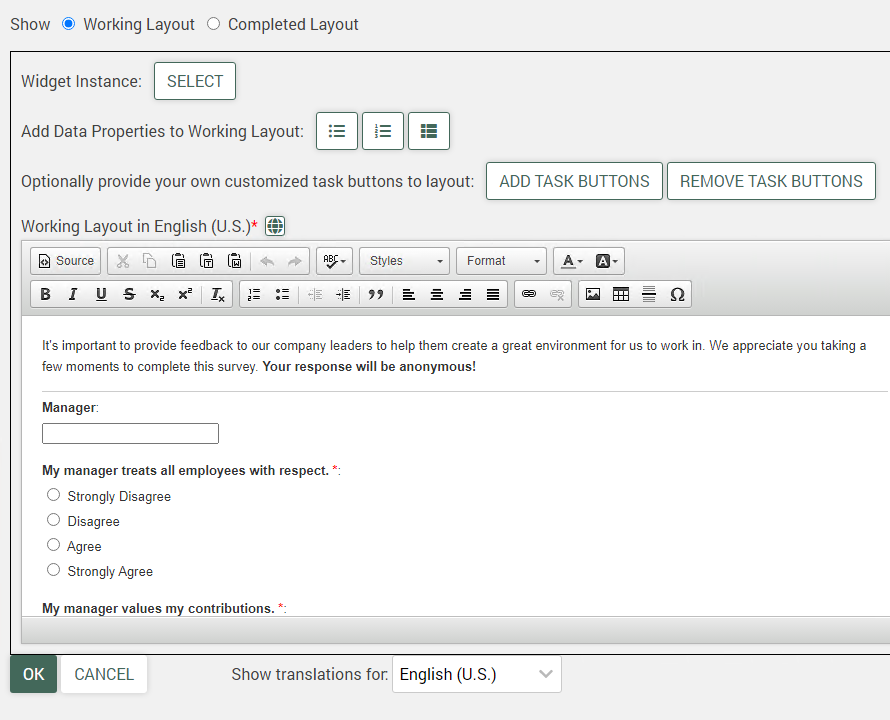
Task Contents
Select “Edit Content” ![]() to design the views that the assigned user will interact with in completing the task. The AkuminaFlowUserWidget, AkuminaFlowTeamWidget and Akumina Flow Owners Management page will use the provided views when hosting the user interface for users to complete tasks.
to design the views that the assigned user will interact with in completing the task. The AkuminaFlowUserWidget, AkuminaFlowTeamWidget and Akumina Flow Owners Management page will use the provided views when hosting the user interface for users to complete tasks.
From this pop-up, you can design the view layout that the assignee will see when they are working the task. There are 2 different layouts used when working a task. Select the desired layout from the radio buttons provided at the top of the pop-up window:
- Working Layout
- Design the view that the assignee will interact with in completing the task. If there are required actions to complete for this task, you can inject those into the view by using one of the provided buttons
- Completed Layout
- Design the view that the assignee will see when they complete the task. Note that the AkuminaFlow widgets provide a property to show or suppress this view.
Working Layout
This page is made up of 4 logical sections:
- High level actions: toggle between working and completed layout displays and “OK” and “Cancel” buttons.
- Different ways to inject content into the view: widget, data properties, task buttons.
- View editor: a CKEditor is provided for designing the HTML view that the assignee will see when working this task.
- Multilingual support: You will design an HTML view for each of your site’s languages. A language selector is provided to toggle the display between languages. If you have the auto-translate license enabled, a globe icon button is provided that will auto translate the text in the CKEditor to the selected language.
Styling the Views
There are 2 recommended approaches for styling the views:
- CSS classes
- CSS classes are provided on all of the main html elements added to the view. Write your own CSS rules for these classes in your site’s css files. You can also use the “Settings” feature to change what CSS classes are used when generating each section.
- Manual Styling
- Use the CKEditor styles or directly edit the element styling from the CKEditor’s Source window.
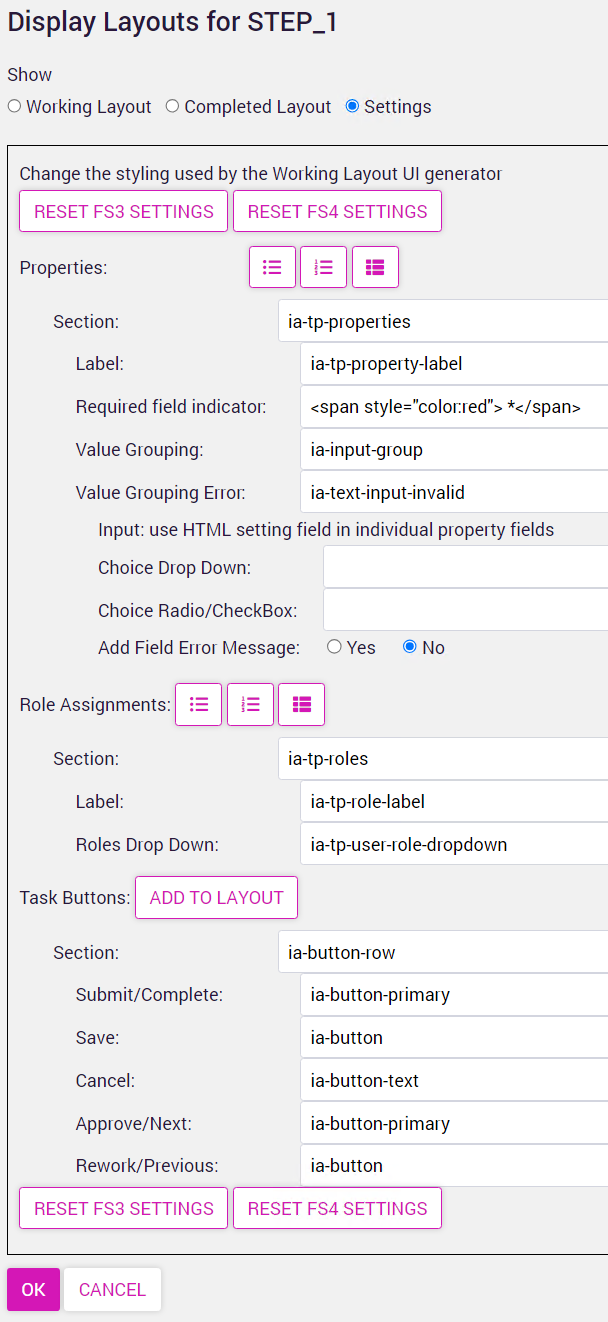
Standard CSS Classes For “Assigning Roles” Actions
- ia-tp-roles
- List of role assignments. Placed on either top-level “ol”, “ul” or “table” element depending on which template you selected
- ia-tp-role-label
- When displaying role assignments in table element, placed on “td” that displays label
- ia-tp-role-value
- When displaying role assignments in table element, placed on “td” that displays user picker field
- ia-tp-user-role-dropdown
- Placed on outer “div” element of user picker field
Standard CSS Classes For “Properties” Section
- ia-tp-properties
- List of injected properties. Placed on either top-level “ol”, “ul” or “table” element depending on which template you selected
- ia-tp-property-label
- When displaying properties in table element, placed on “td” that displays label
- ia-tp-property-value
- Placed on either “td” or “li” element that displays property value
- ia-input-group
- placed on “div” element that contains property input field
- ia-text-input-invalid
- dynamically placed on “div” element that contains property input field if input value is invalid (e.g. missing)
Standard CSS Classes For “Task Buttons” Section
You don’t need to add “Task Buttons” to your view. The widgets will add standard task buttons (e.g., Save, Cancel, Submit) if not provided. But you may want to control what task buttons are included and have more control over their display. If so, add the Task buttons and then configure them (via CKEditor source window) as you need.
- ia-button-row
- Placed on “div” which contains buttons
Customize How the Working Layout is Generated
Use the “Settings” feature to edit the default CSS classes used when generating each section of the Task’s Working HTML.
The “Settings” persist for your current Process Edit session.
New in 6.5 is the feature to inject field level validation error messages underneath each required property (see “Add Field Error Message”). The Akumina Flow widgets will look at the following locations for an error message to display. It will use the first one found from:
- Defined property error message in process definition; see Process Properties Section: Edit Property
- Custom language token for this process: YOUR_PROCESS_ID.teamprocess.instance.errors.isRequired
- Default language token for Akumina Flow: teamprocess.instance.errors.isRequired
Advanced Techniques using Knockout JS
Akumina Flow Layouts use Knockout JS for 2 way binding. This framework offers the flow designer additional tools to control the UI. For example, if you have a form that has questions that should only be displayed based on the answer to a previous question, you can use knockout to implement this. For this discussion, assume there is a choice question that asks the employee their highest level of education. The valid choices are: High School, College. And if the user selects “College”, another question should be displayed which asks them their major area of study. A simple html for this, using knockout js is shown below:
<li class="ia-tp-property-value">
  <label for="EDUCATION1642778154469"><strong>Education<span style="color:red"> *</span></strong>:</label>
  <div class="ia-input-group" data-bind="css:{'ia-text-input-invalid':!actions.isEDUCATIONValid()}" id="EDUCATION1642778154469">
    <select data-bind="value:actions.propEDUCATION"><option value="HIGHSCHOOL">High School</option><option value="COLLEGE">College</option>
    </select>
  </div>
</li>
<li class="ia-tp-property-value" data-bind="visible:actions.propEDUCATION() == 'COLLEGE'">
  <label for="MAJOR1642778154469"><strong>Major</strong>:</label>
  <div class="ia-input-group" id="MAJOR1642778154469">
    <textarea data-bind="value:actions.propMAJOR" maxlength="512" rows="5"></textarea>
  </div>
</li>
The key code is the data-bind=”visible:actions.propEDUCATION() == ‘COLLEGE'” attribute that was added to the “li” that displayed the “Major” question.
Why do I see “tp” and “team process”?
The internal development name for Akumina Flow is “Team Process”. You will see that naming convention on lower level development resources and the API.